()Message Excel Overview
The Excel MMS Conduit works with Photoshop for advanced communication of your creative output with your clients, associates, and for direct marketing.
It's an alternative to the overcrowding of your personal phone for business activities, especially for the multitude of photos that are involved with everyday activity.
It gives you the ability to directly access photos that you take or are shared with you by your associates in a very organized way, sitting at your desktop computer.
You can share large Jpg and your Psd files directly with another person or collaborate direcily with another person's onduit number.
Starting the Conduit
The Photoshop-connected MMS Conduit always starts in 'Auto Mode' waiting to take in messages through the 'Secure Number' you purchased with your subscription.
The Conduit will work without Photoshop, it just limits your ability to edit files qyuckly.

You can refer to the Guide in the MMS Conduit for details about how to message in and out of Photoshop directly.
This document will show you how to use Excel to organize and access your message traffic to better control and find messages to assist your communication needs.
Click the Excel button at the top of the screen on the right to access the master Excel sheet which retains all of your message traffic through the Secure number.
The Assistant program helps with Excel processes and will sit on the taskbar minimized while Excel is connected to the Conduit. After another 10 seconds or so, the Excel workbook will load.
The UserForm that sits above Excel will allow you to filter and select the messages that you want to work with in Conduit, you may not have to edit cells directly, just checkbox select messages after they are garnered into your Working sheet.
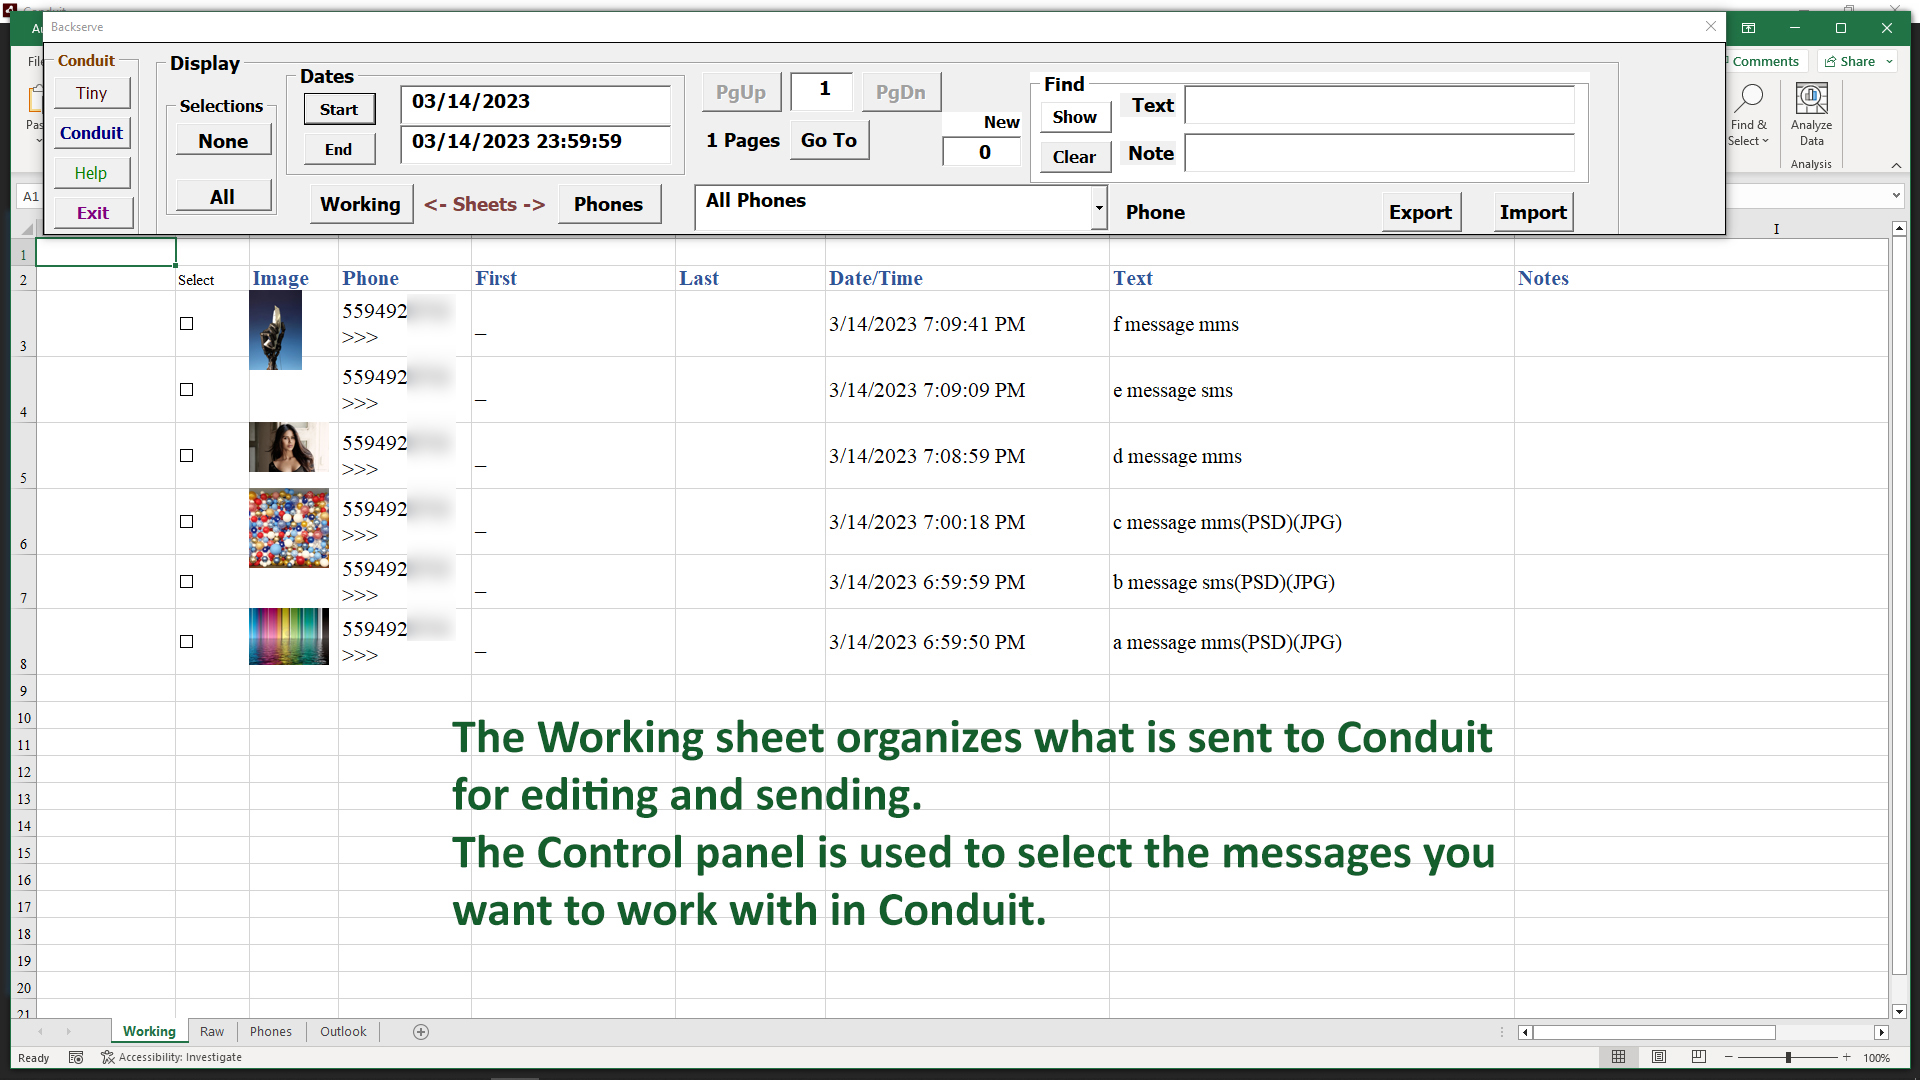
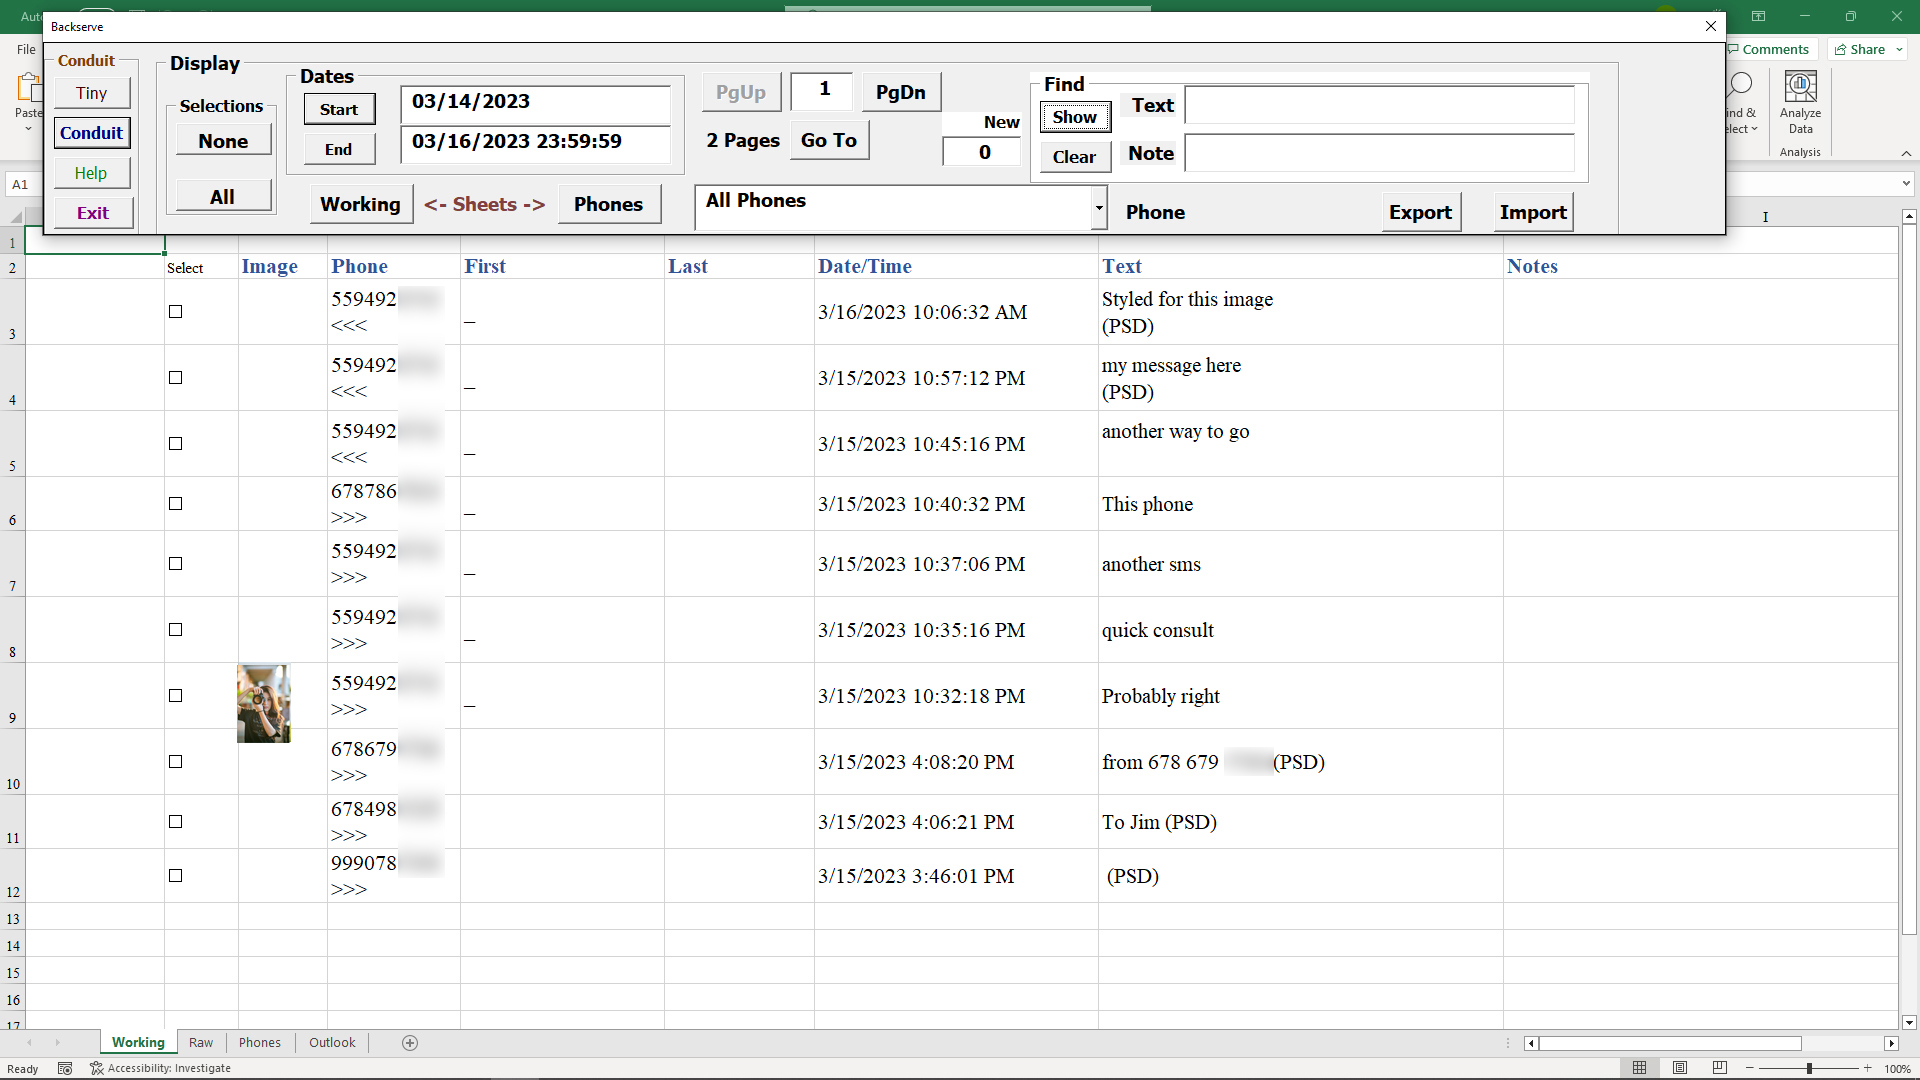
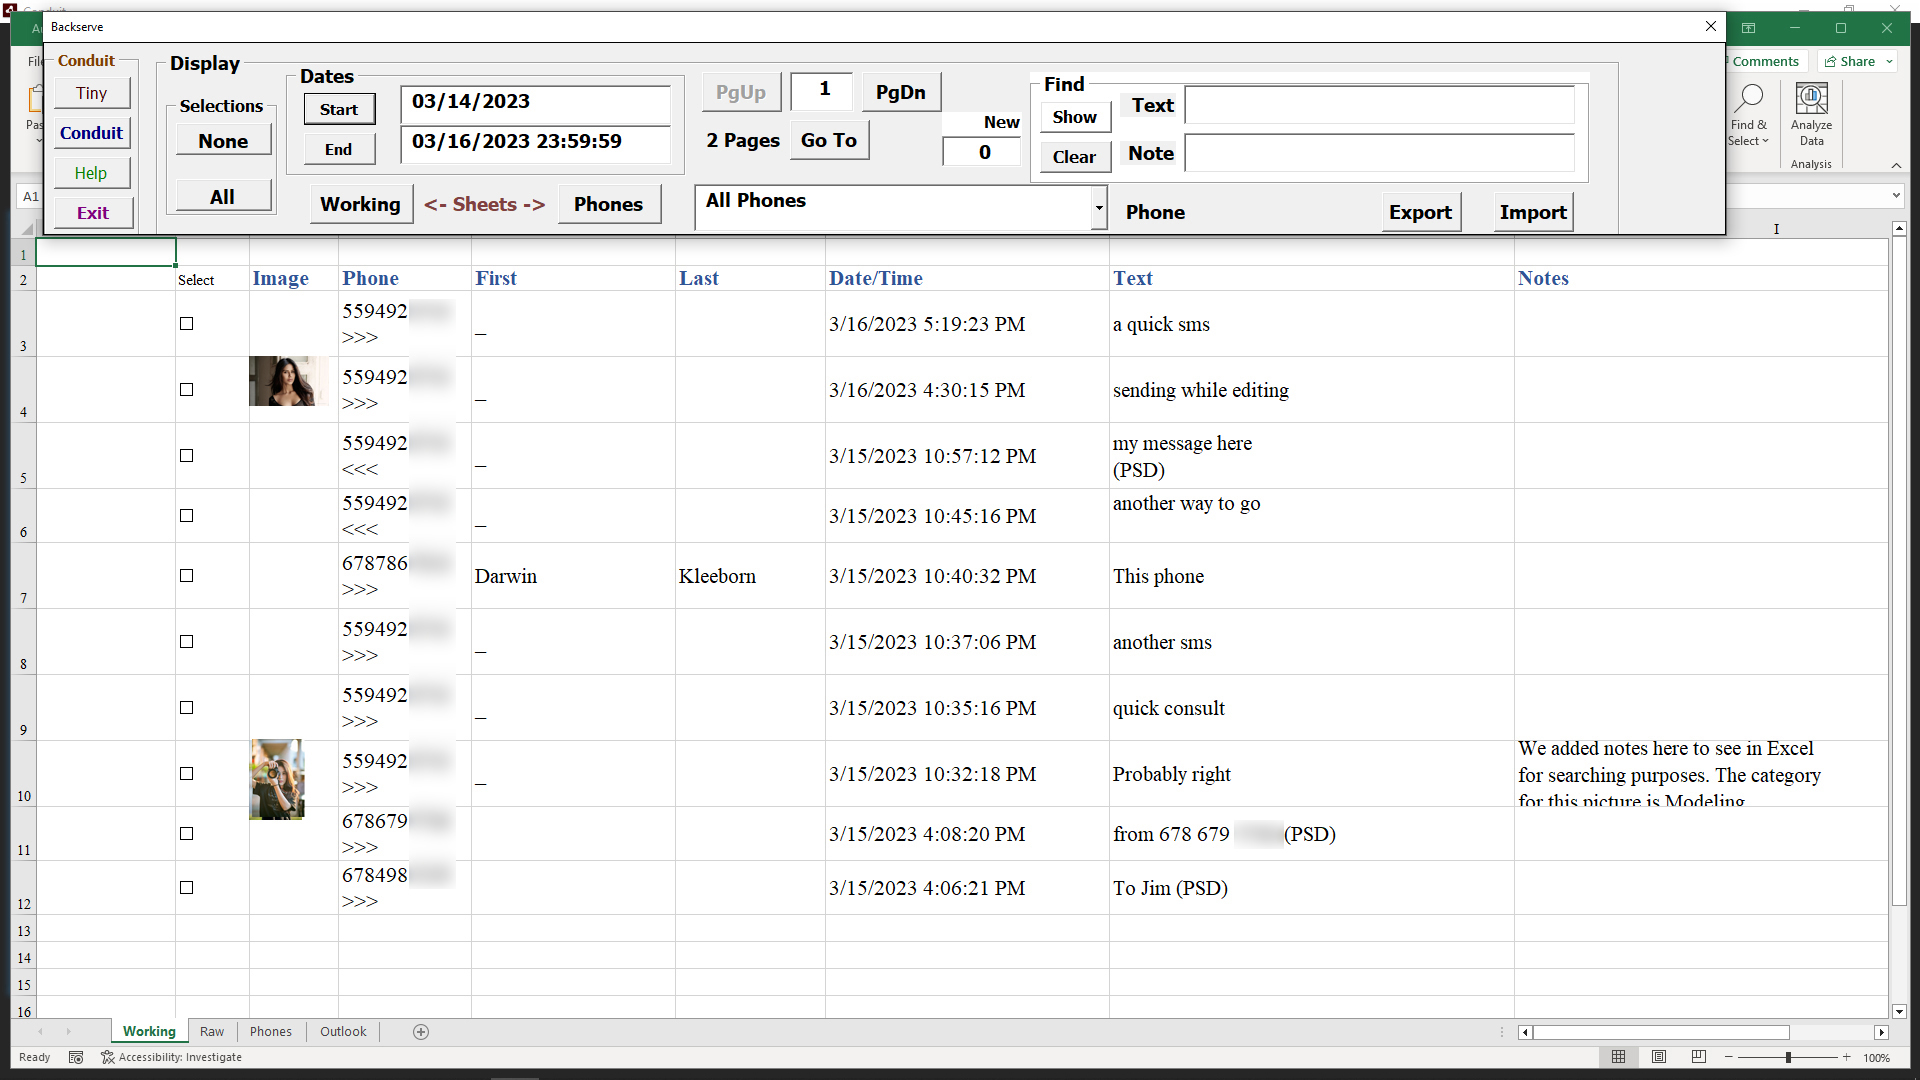
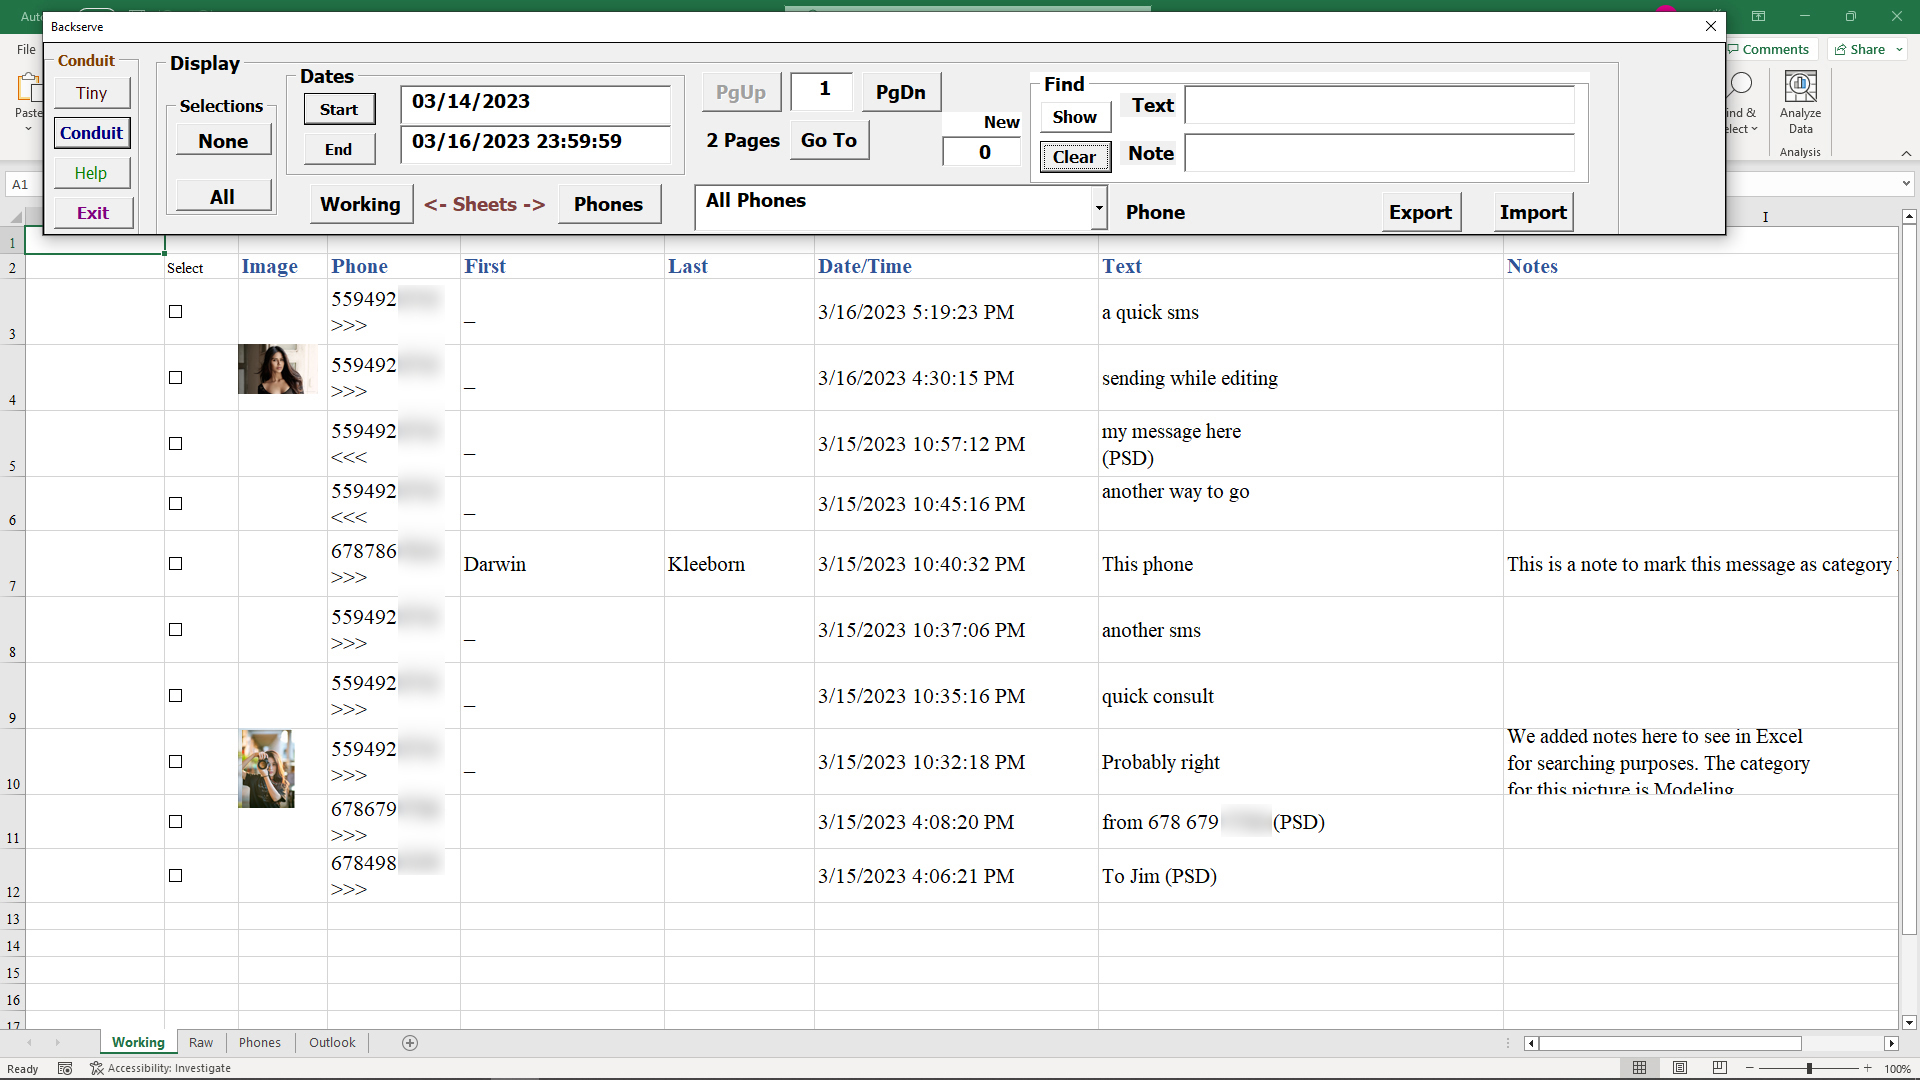
The Excel workbook opens and most of your message handling is with the Working sheet and the Control Menu as shown here.
The Control Menu provides a way in and out of the Excel workbook, and the way to use the Extended functions for searching and selected your messages, both incoming and outgoing.
()Control Menu
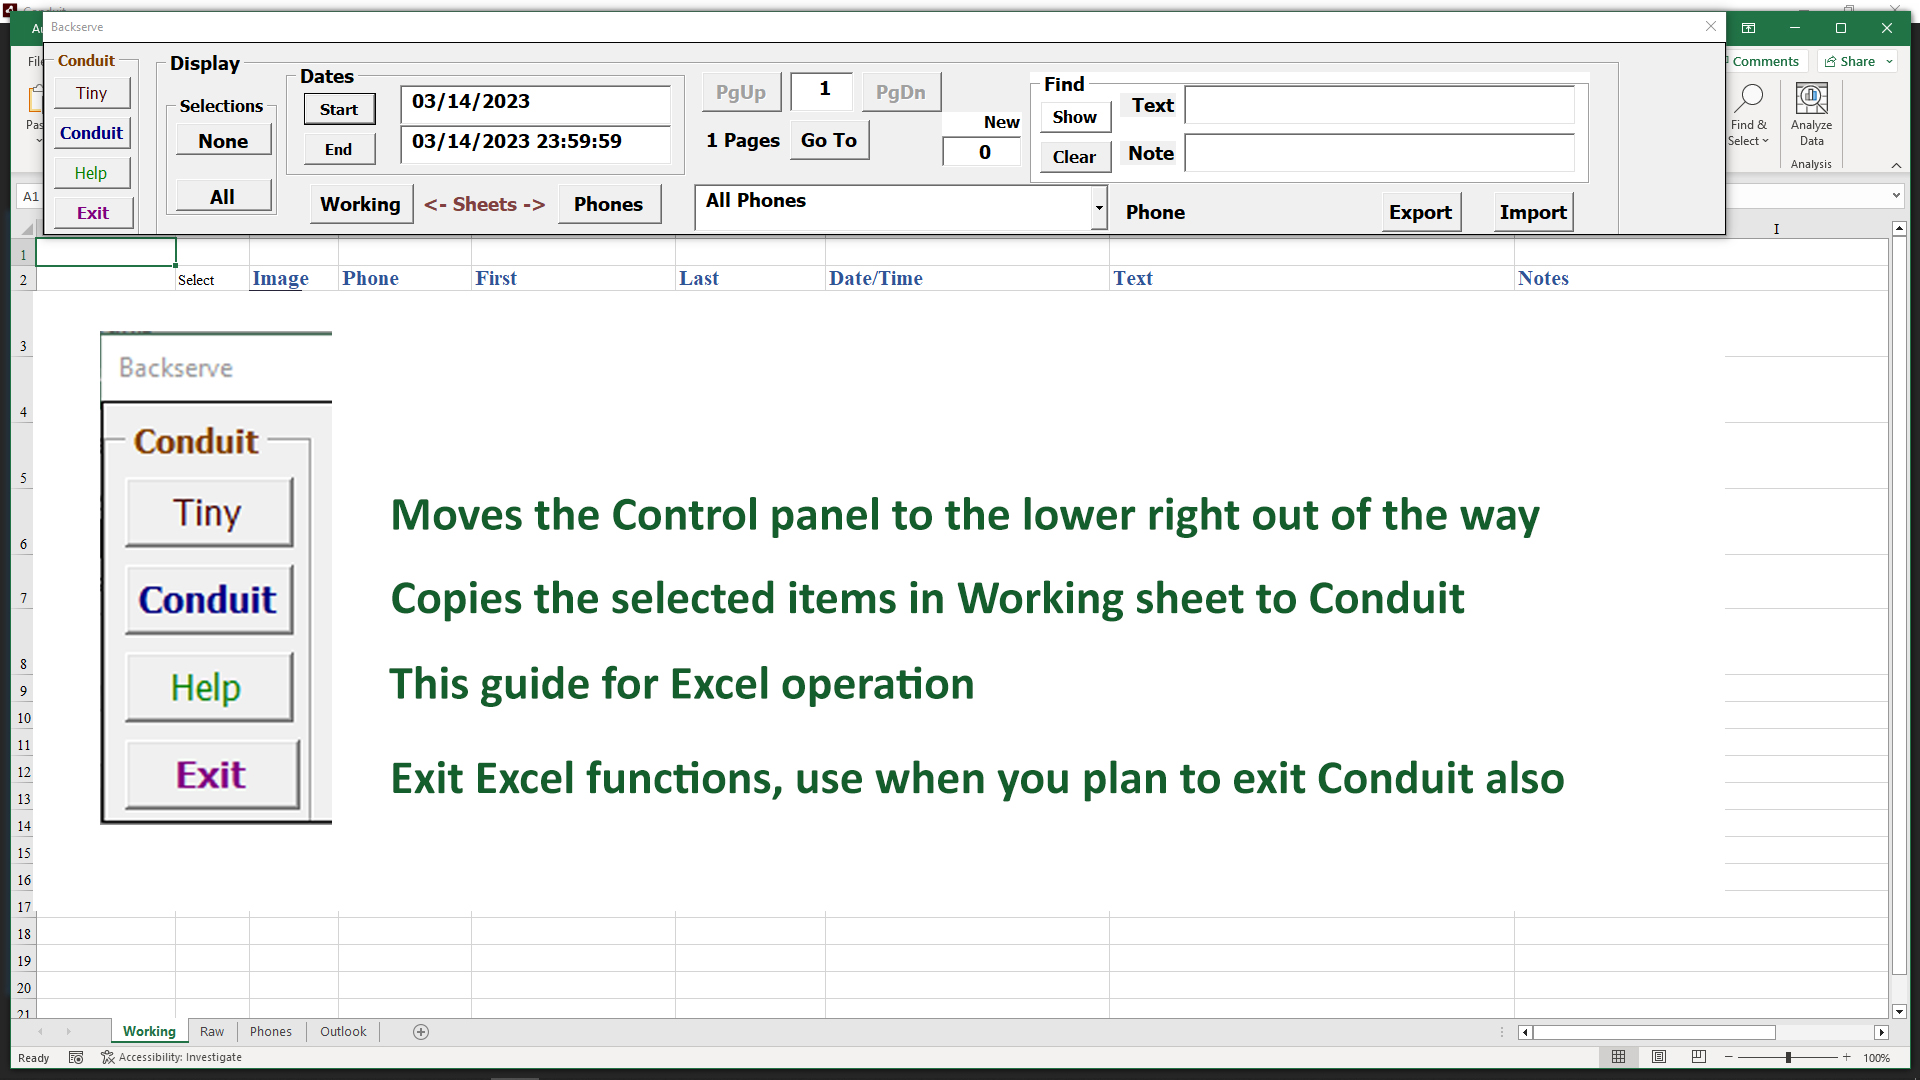
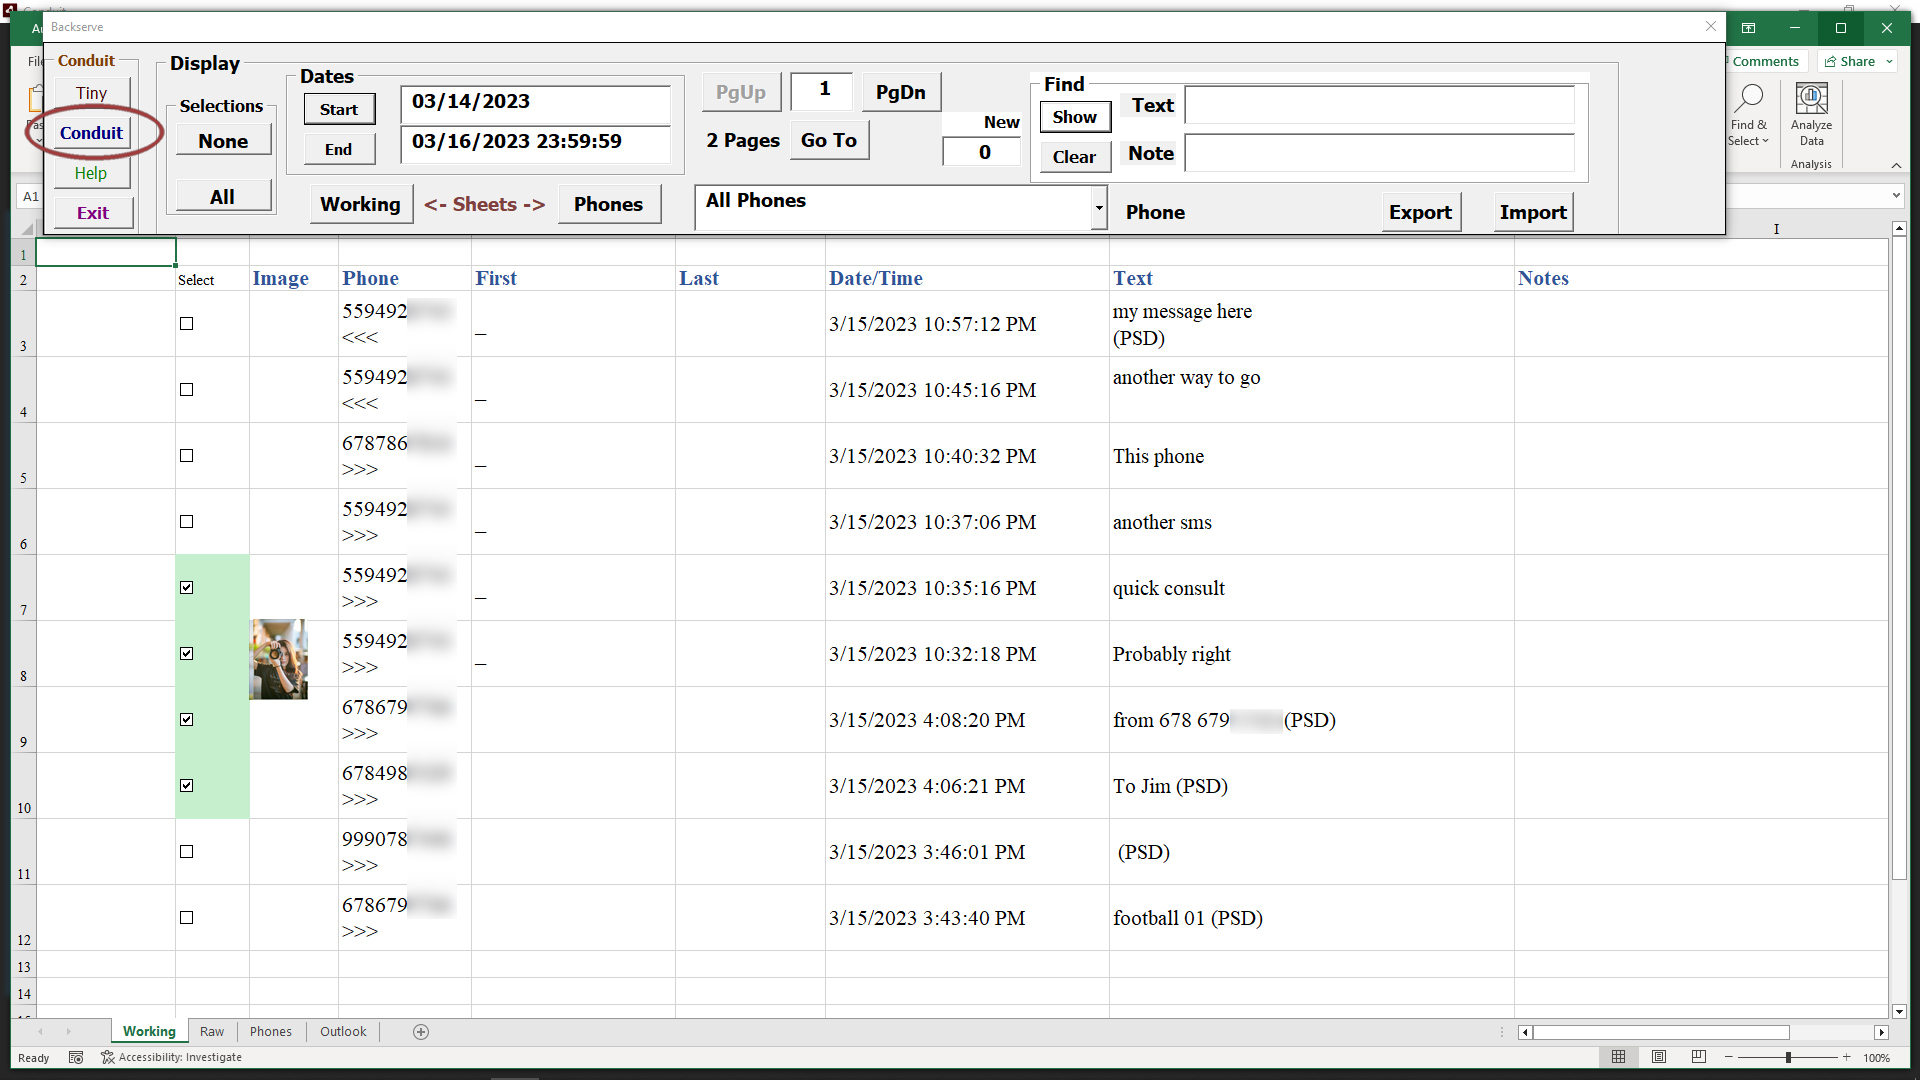
As shown, the different important functions appear on the left side of the Control Menu.
Use the Conduit button to go back to the MMS Conduit, whether there are messages selected or not in your Working sheet.
Only use the Exit button when you are also going to Exit the Conduit as well. In most cases you can use the Exit from Conduit and it will save your work in the Excel workbook.
Tiny Control Menu
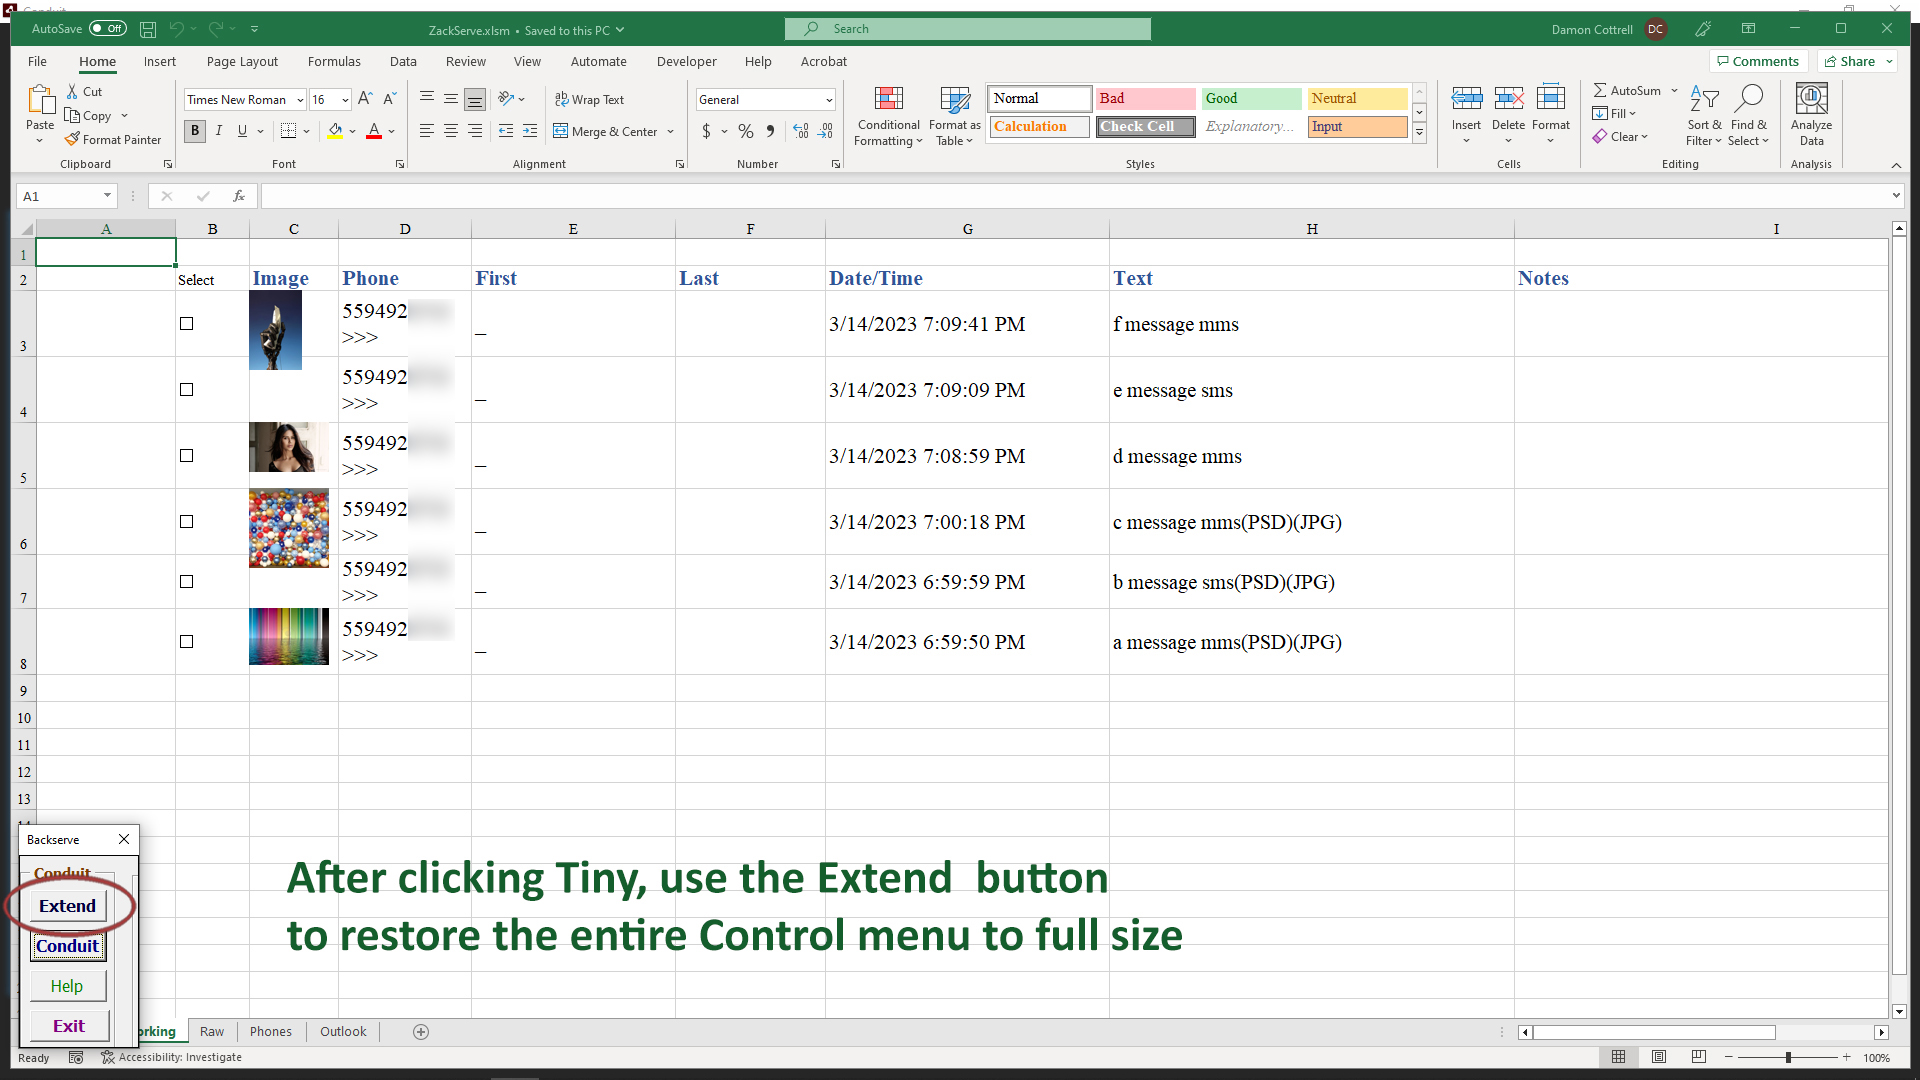
When you click the Tiny button, the Control menu is moved out of the way of the Working sheet entries until the Control options are needed.
When you click the Extend button, the entire range of options returns for you to select the messages you wish to work with at any time.
The intent of the Control panel options is to free you from the need to manually filter through messages, the Working sheet is the 'playground' for this organized way of finding messages and working with your clients and associates.
Message Counter
All messages are absorbed by Excel into the Raw sheet, whether you have it open or not. The count of messages will increase. Any time you use the Excel button in Conduit to get to the Excel workbook, the count will change as it adds entries into the Raw sheet.
You never need to work with the Raw sheet directly, the Control menu will give you easier control and access to the raw messages.
()Date and Time Selection
All incoming and outgoing messages are tracked by Excel in the Raw sheet. To better show how to use Excel, let's go through the normal way to organize messages.
Date Range of Messages
An important way of organizing messages is to focus on a date range that you want to work with. Click the End button next to the End date.
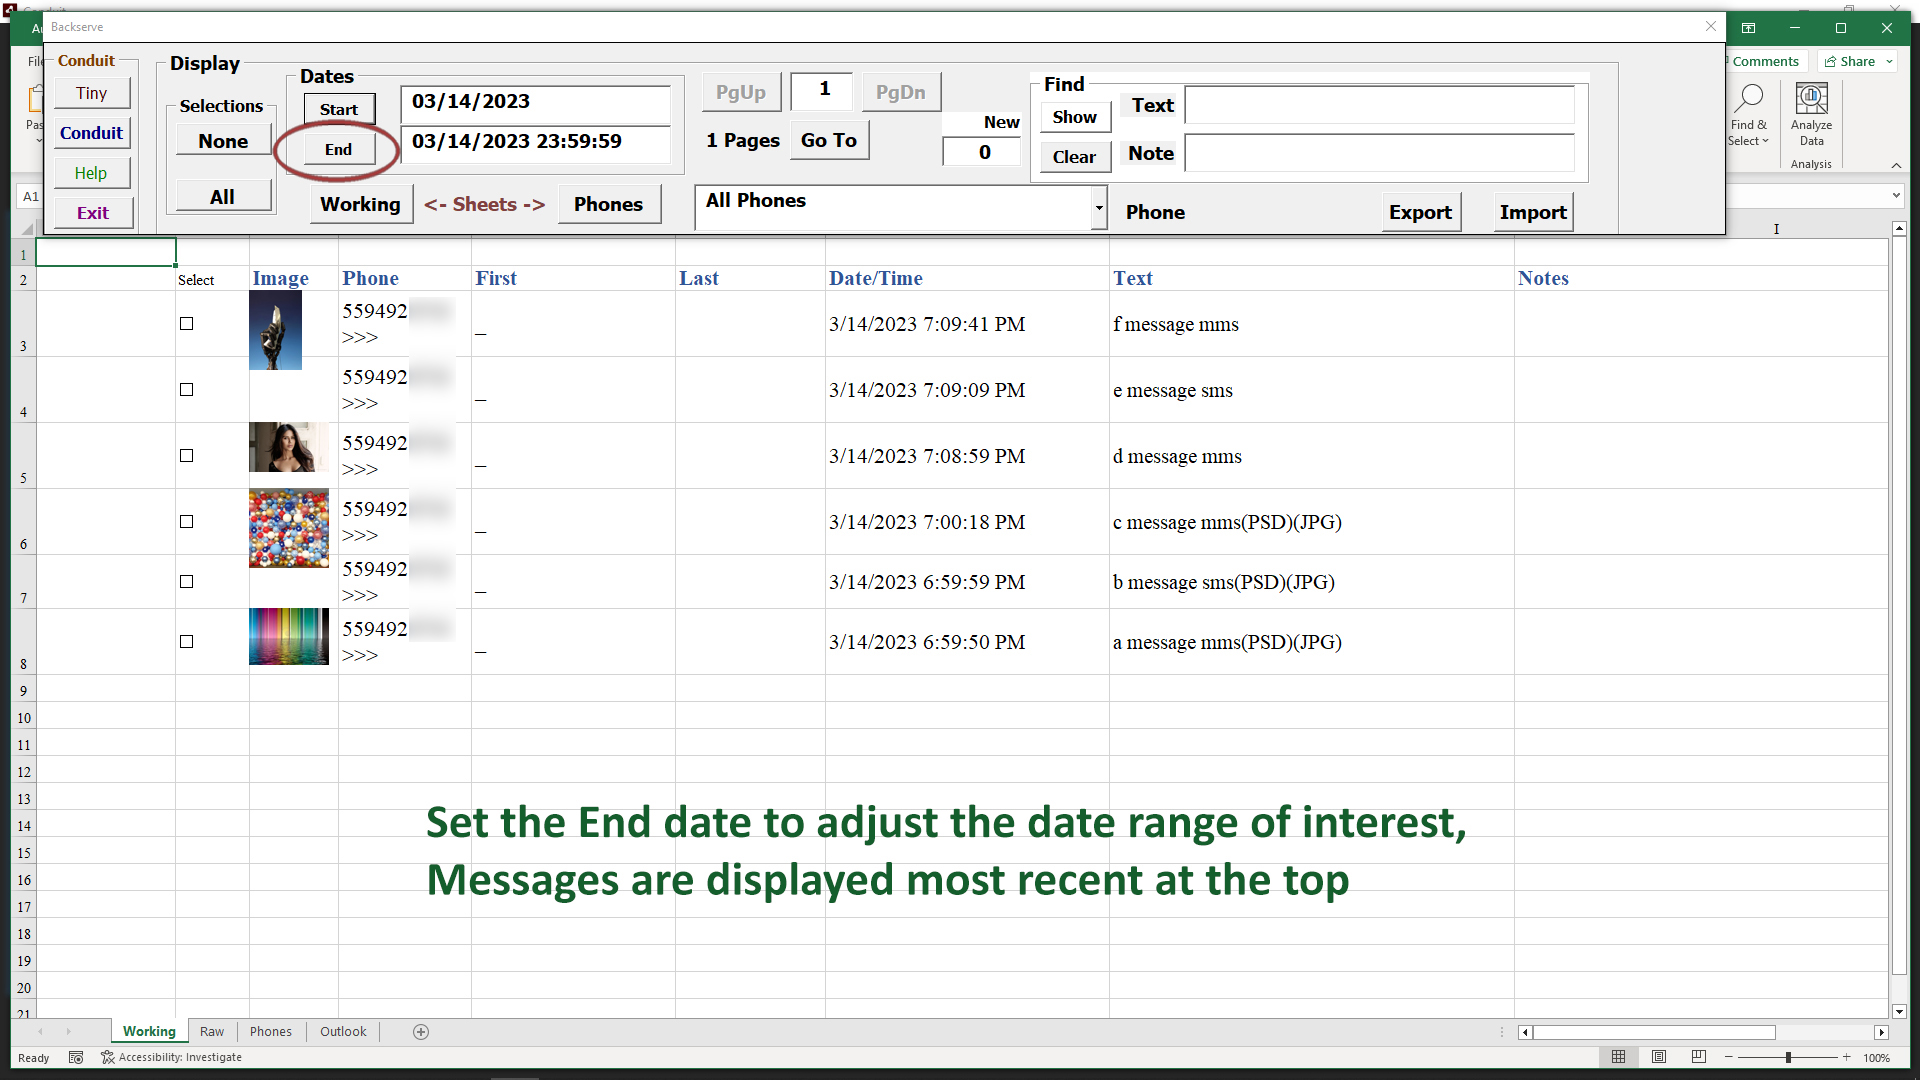
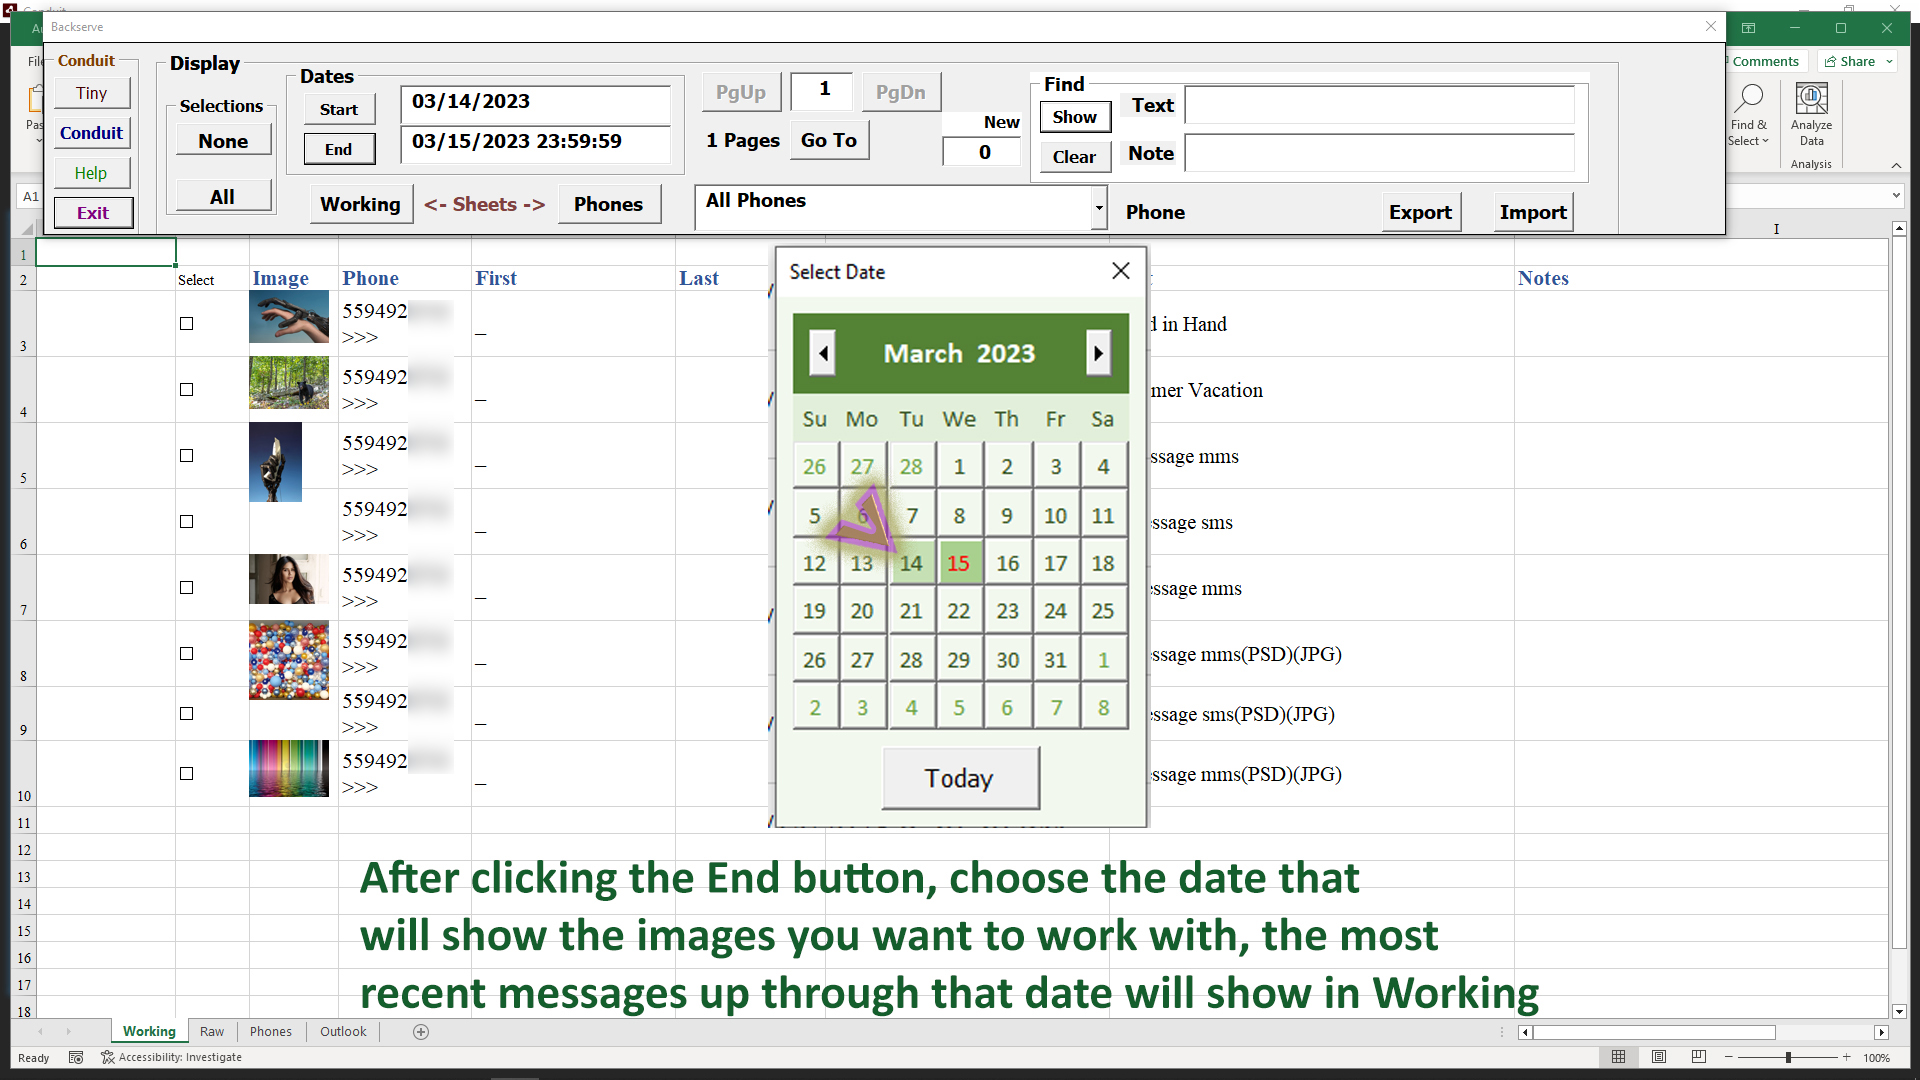
Pick a date from the calendar, and it will set the End date. You could also manually enter a date in the End field, followed by the Show button.
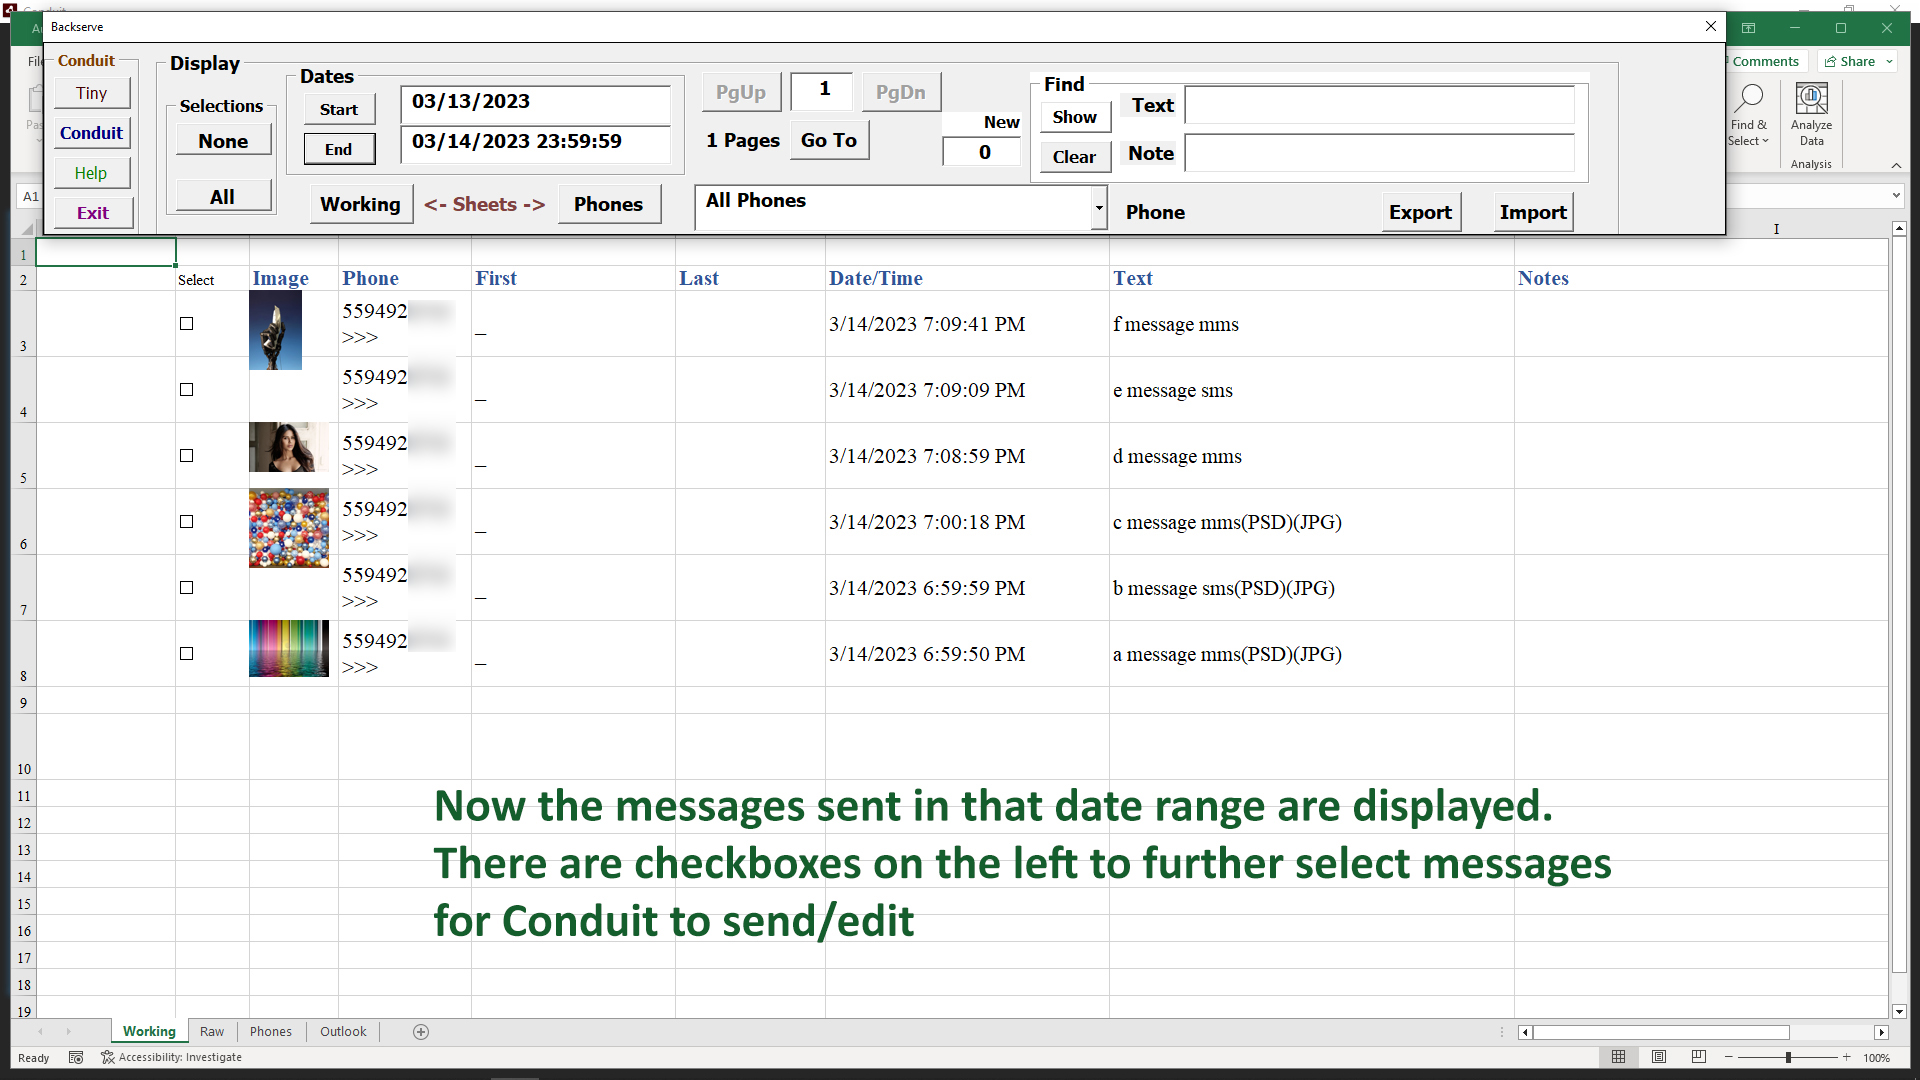
Now the messages within our date range appear, gathered from the Raw sheet. There is a checkbox to the left of each message, that will be used to narrow our range of interest to just the messages we need to work with from that period of time.
()Search Message Text
Searching Message Text
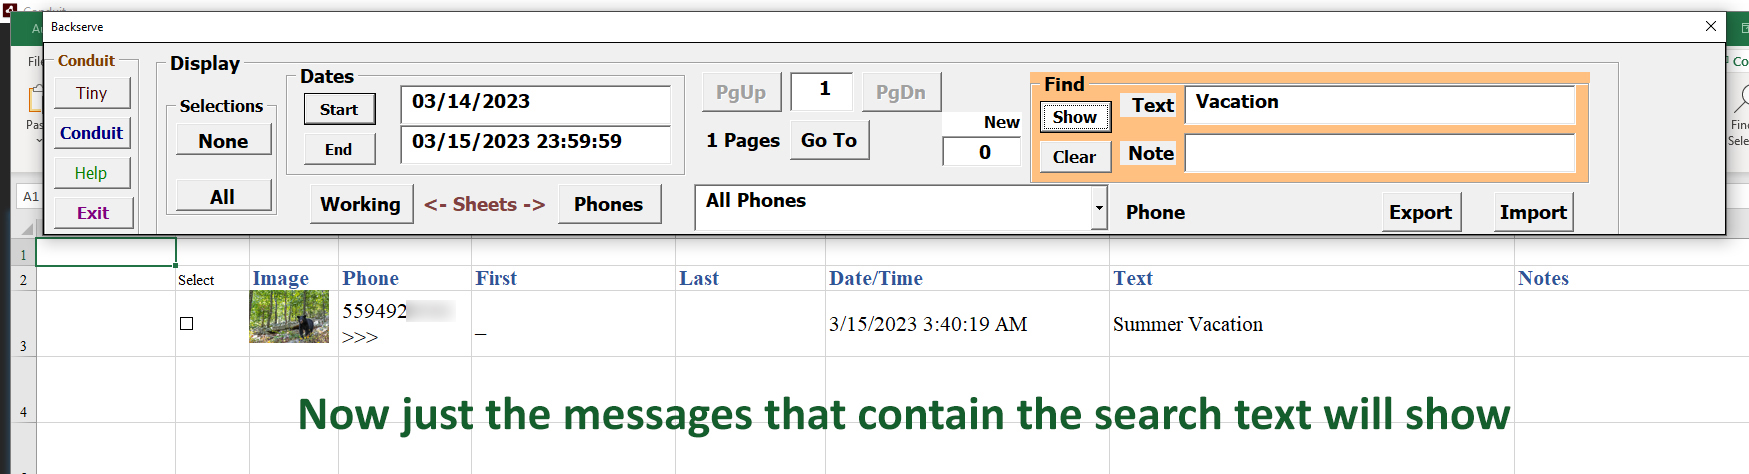
Another way to isolate the messages we want to work with is to search the message content for keywords of interest. Enter the word or phrase that you are targeting in the field shown for finding it in the Text of the message(s).
Click the Show button.

After clicking the Show button the messages that match the search criteria are shown in the Working sheet.
The same type of search can be done on the Notes that appear in the Working sheet. Notes are added by you in the Conduit, or when you change the Notes column of any message in the Working sheet.
()Working Sheet
The Working sheet is the way to reflect the messages we want to further edit or send. Once they are selected to the Conduit, there are more ways to work on that range of images.
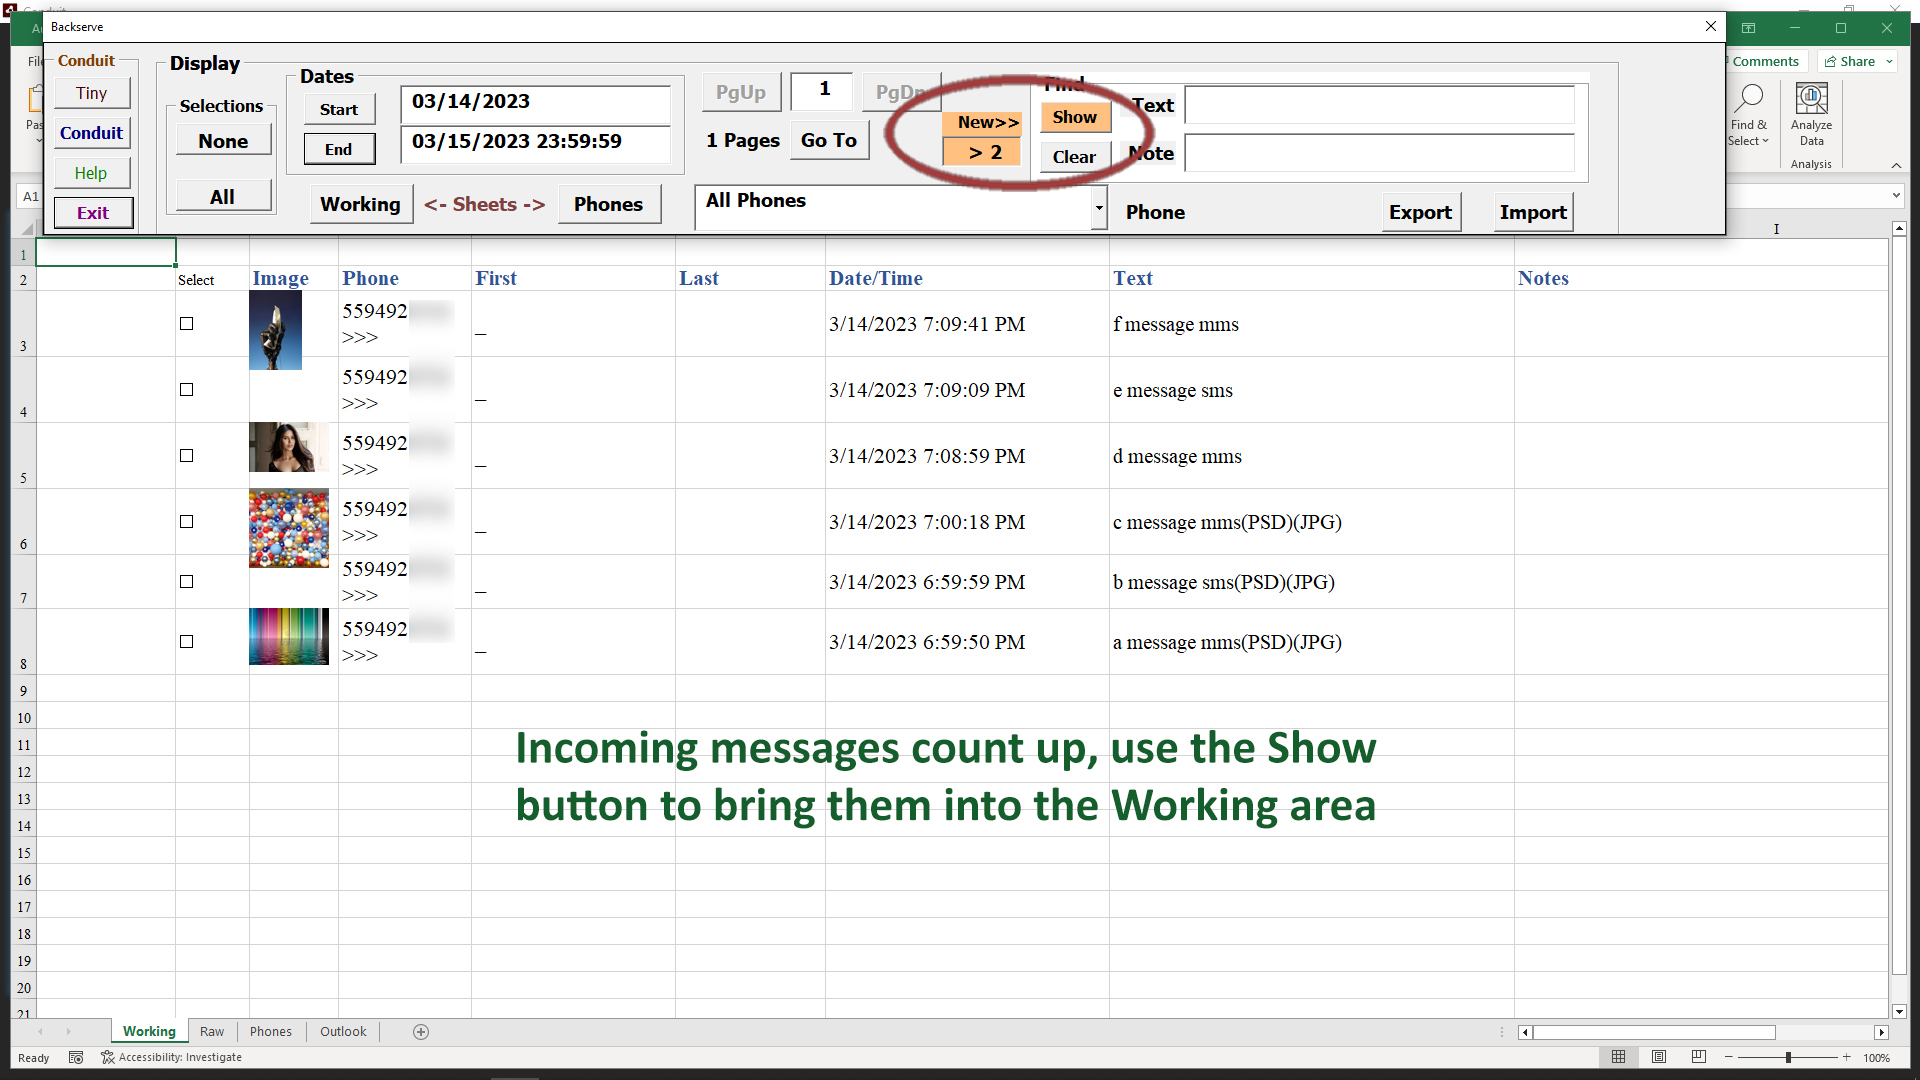
Incoming Messages Counter
When Conduit is gathering messages while we are working in Excel, a counter tracks them on the Control panel. The counter field and the Show button turn orange, and the count of incoming messages is shown.
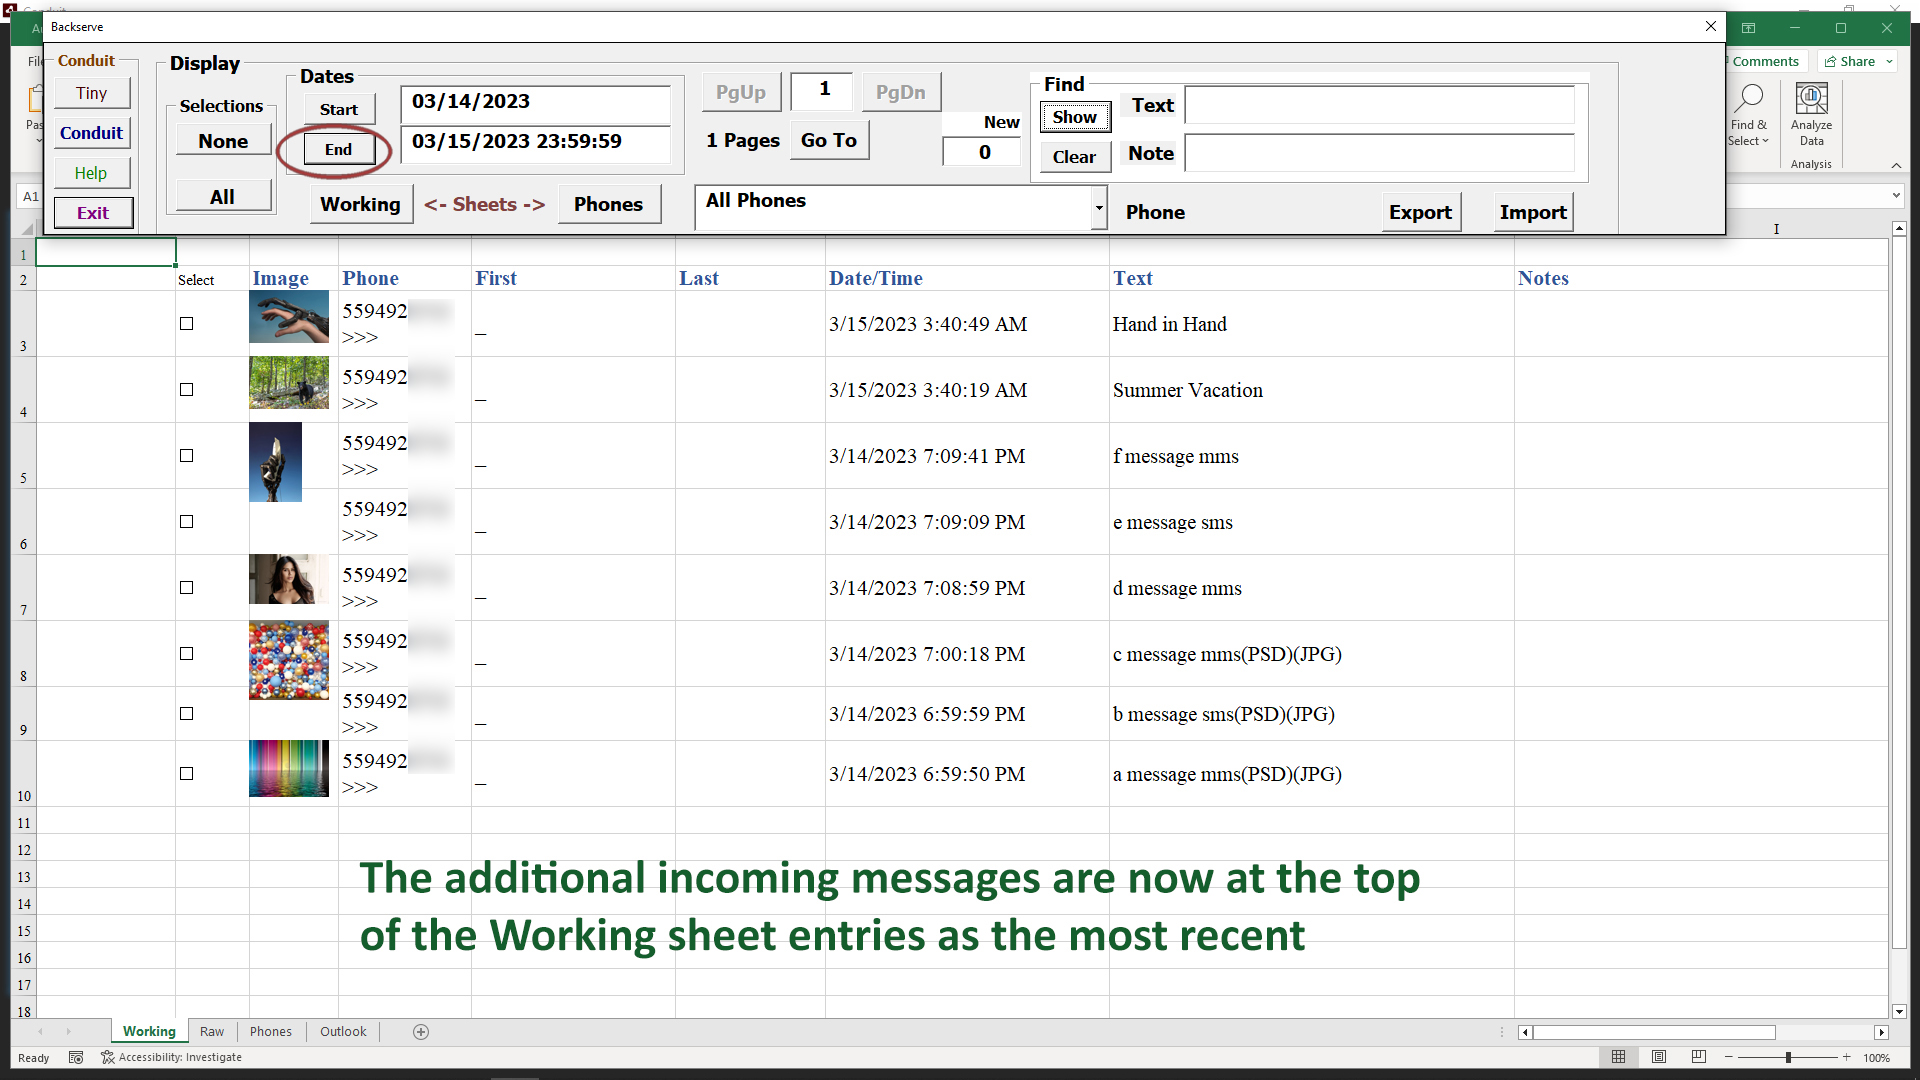
When you are ready to work with the newer messages, click the Show button and they will be displayed at the top of the Working sheet, since they are the most recent messages.
This will clear the counter and it will return to its normal color, showing zero incoming messages, until more arrive.
()Select Entries on Working Sheet
Once the set of images in the Working sheet are roughly what you were looking for, you can further select which ones to copy to Conduit's list.
Use the checkboxes at the left of each Working entry to select or unselect it.
The 'All' button will select all the Working sheet entries, the 'None' button wiil unselect all of the entries. Both buttons are at the left of the Control panel, in the Selections area.
End Date Range
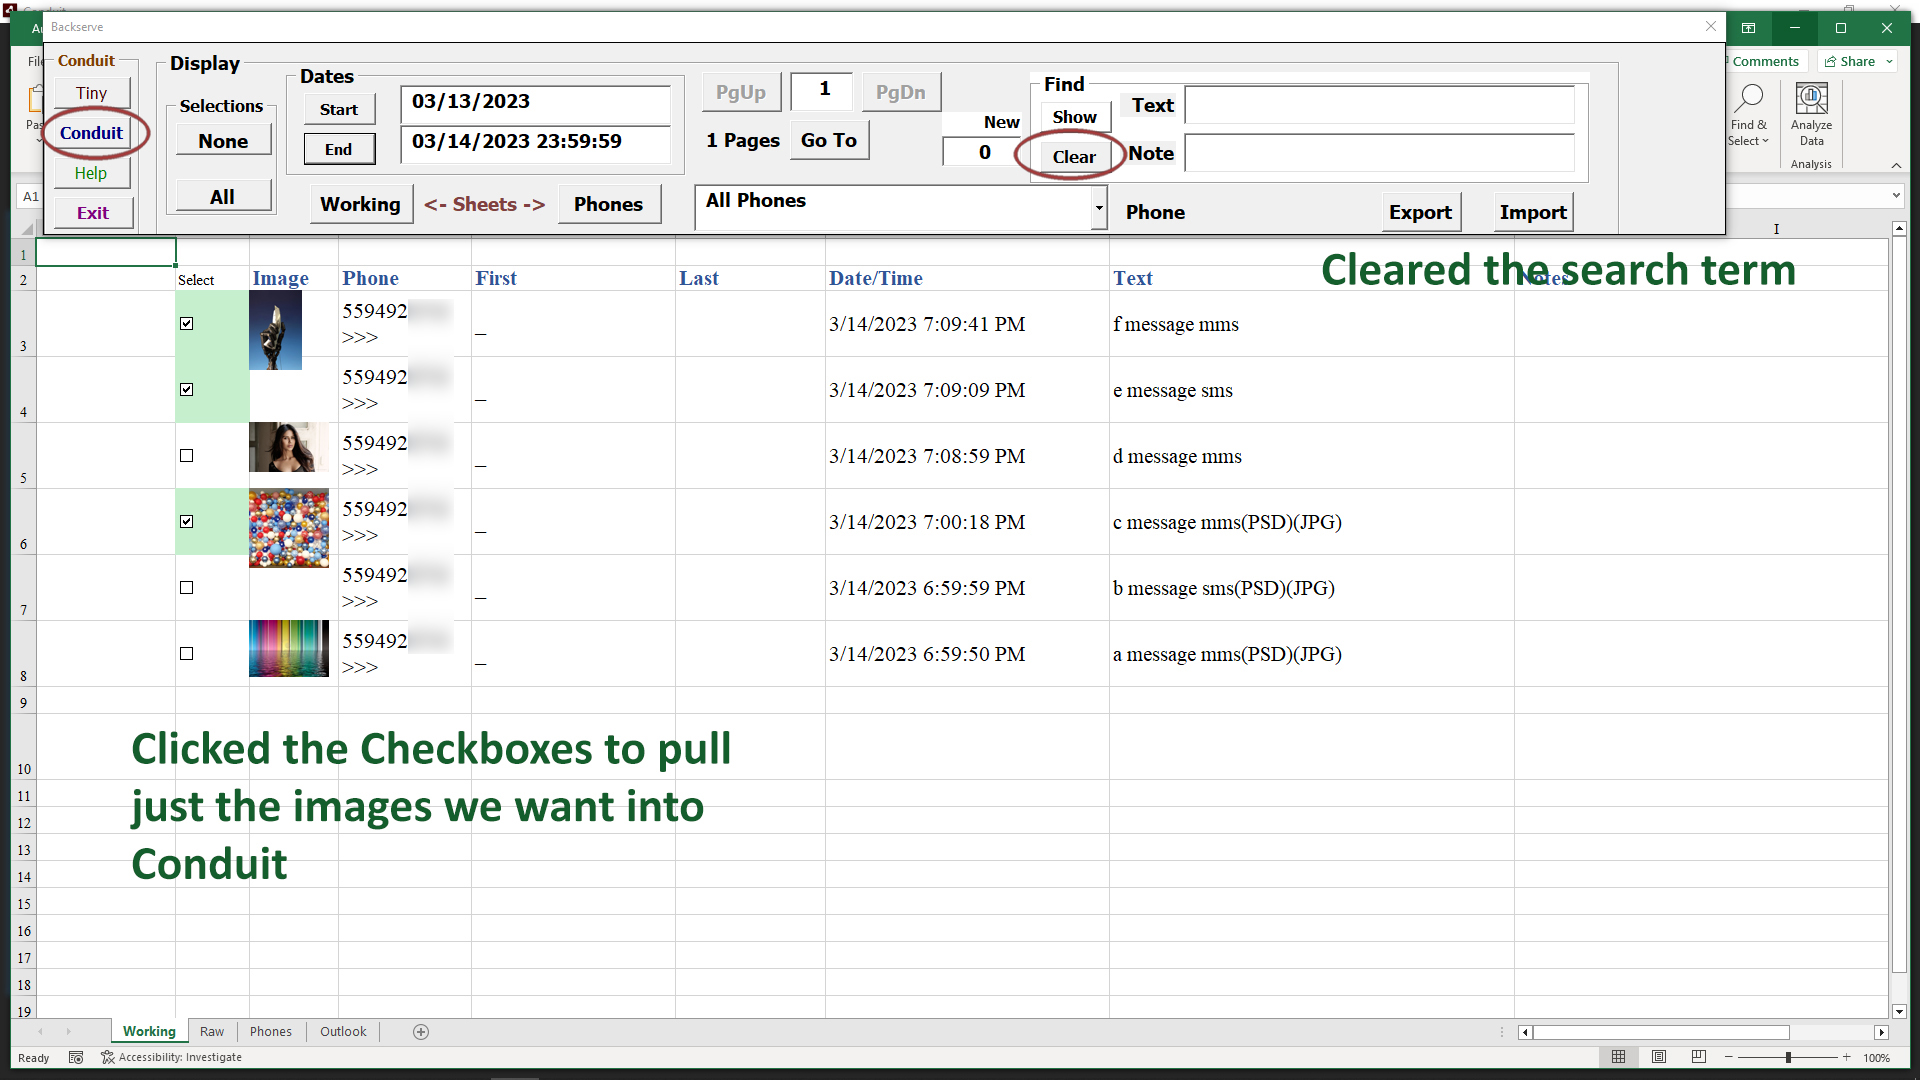
Now we will reduce the ending date of our date range. Remember to Clear the message text and note text search fields so you don't get misleading results if that further search restriction is not desired.
So we clear the search fields with the Clear button, then click the End button to select the End date on a calendar.
Then we have a range of messages we want to work with.
Now we click the checkboxes to the left to select the ones we want to use in Conduit for editing or sending, then we click the Conduit button on the left side of the Control menu.
Click the Conduit button. This will bring us back to the Conduit in the Times tab, where the message list appears.
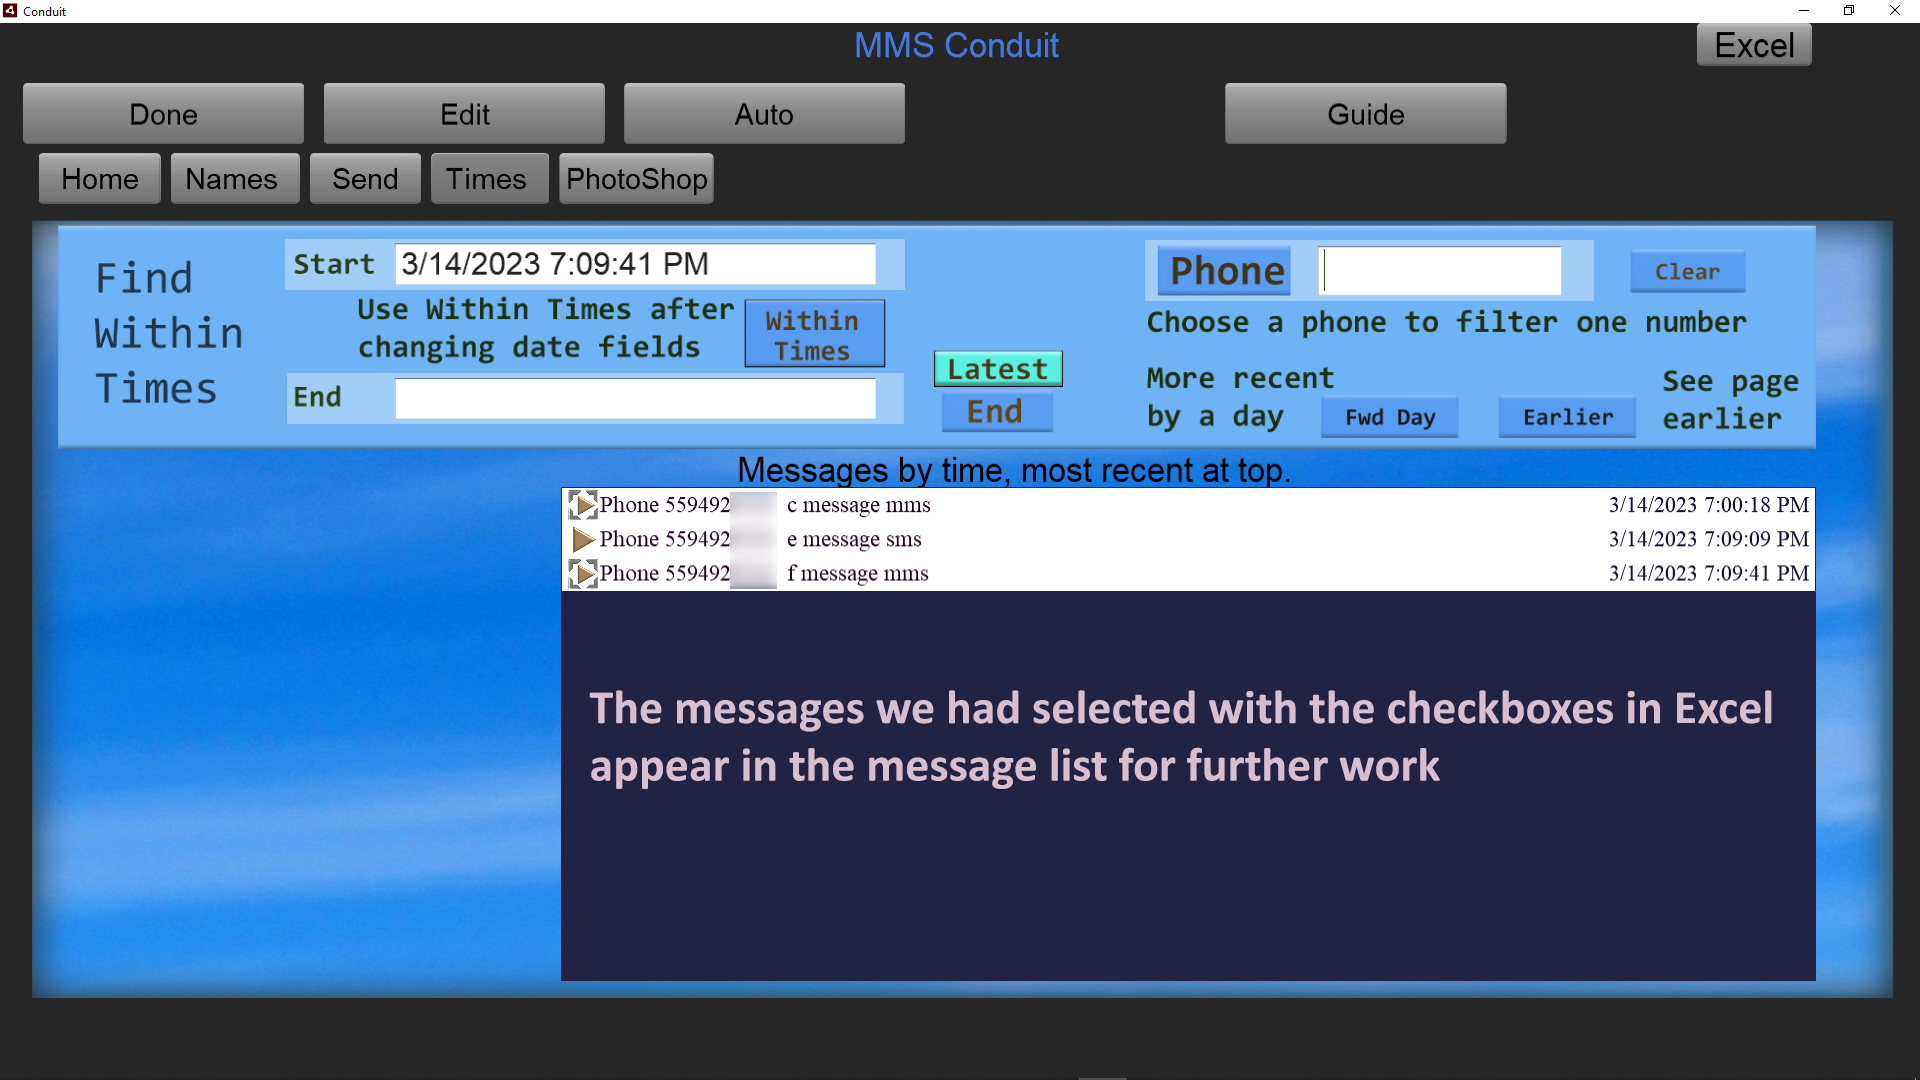
To work with any message for sending or editing, click one of these messages in the list, these were checkboxed in Excel.
To return to Excel use the Excel button in the upper right, the same way you got there before.
When you select messages with checkboxes, they can only be selected in the current page(see the Pages section). Select the messages you wish to work with and click the Conduit button to further edit/send messages from the ones selected.
When you return to Excel, you will still be at the current page of messages so you are able to continue select and working with messages in the proper order.
()Pages in Working Range
When you select messages by date or any other criteria in Excel, the Working sheet only shows 10 entries at a time. Pages of 10 entries are created to allow easier navigation and selection of images.
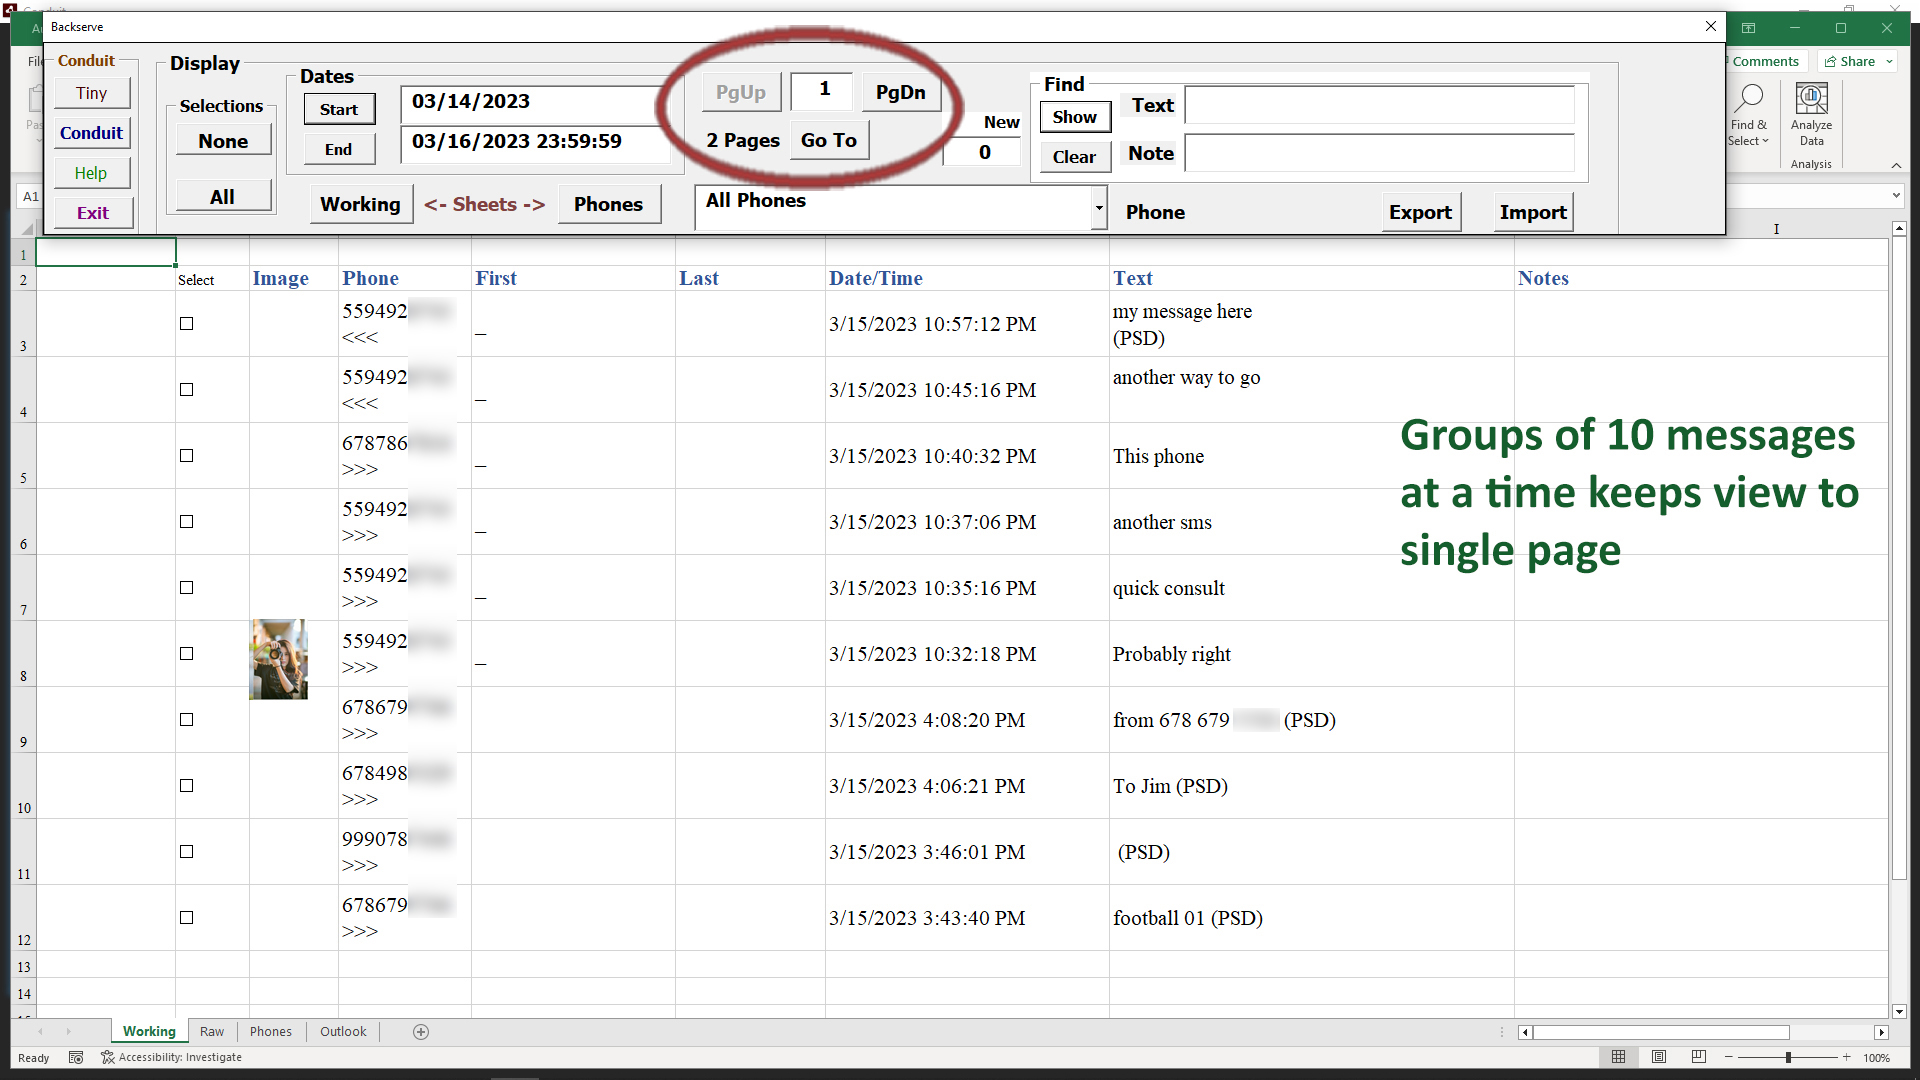
The group of buttons for moving through pages consists of
PgUp - for listing more recent messages
PgDn - for listing earlier messages
Page # - shows current page
Pages - shows how many pages total
Go To - takes you to a page entered in the Page # field
By entering a page number in the Page # field and clicking Go To, you can move directly to a specific page of the total range of pages.
If there are many pages, it may help to change your criteria, using a smaller date range will reduce the number of pages.
Choosing a specific phone number in the drop-down list will narrow the number of message pages to just that phone number.
Seeking a specific keyword in the message text will also greatly reduce the number of pages.
When you select messages with checkboxes, they can only be selected in the current page. Select the messages you wish to work with and click the Conduit button to further edit/send messages from the ones selected.
When you return to Excel, you will still be at the current page of messages so you are able to continue select and working with messages in the proper order.
()Working in Conduit
Select a set of messages in Excel with the checkboxes at the left of the message data.
Click the Conduit button to form the message list under the Times tab in Conduit, which allows you to edit images and send the edits.
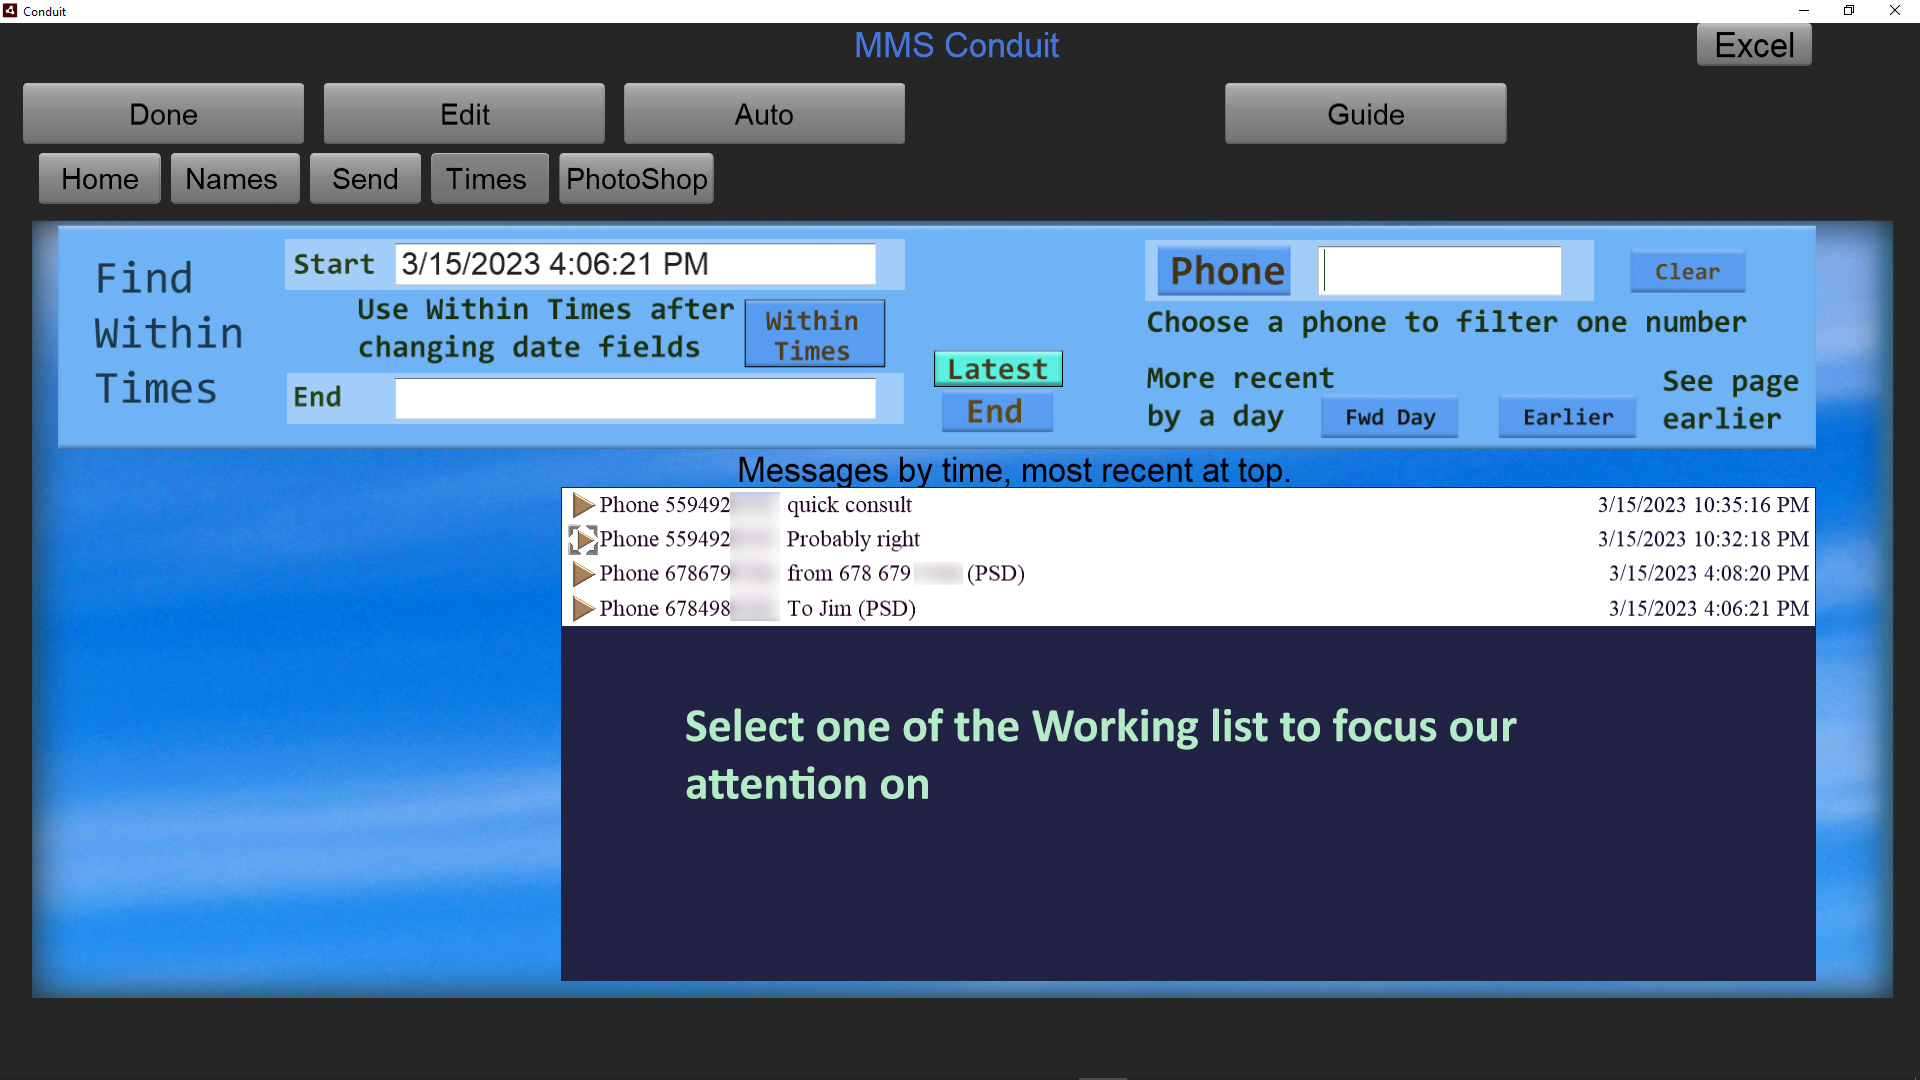
The messages we selected in the Working sheet show up in Conduit's list of messages in the Times tab.
Excel is minimized so we can concentrate on sending and editing images and text with those that were checkbox selected.
Let's step through a sequence in Conduit to edit an image now that we have made the selections in Excel to fill the list in Conduit.
Click on one of the message list entries.
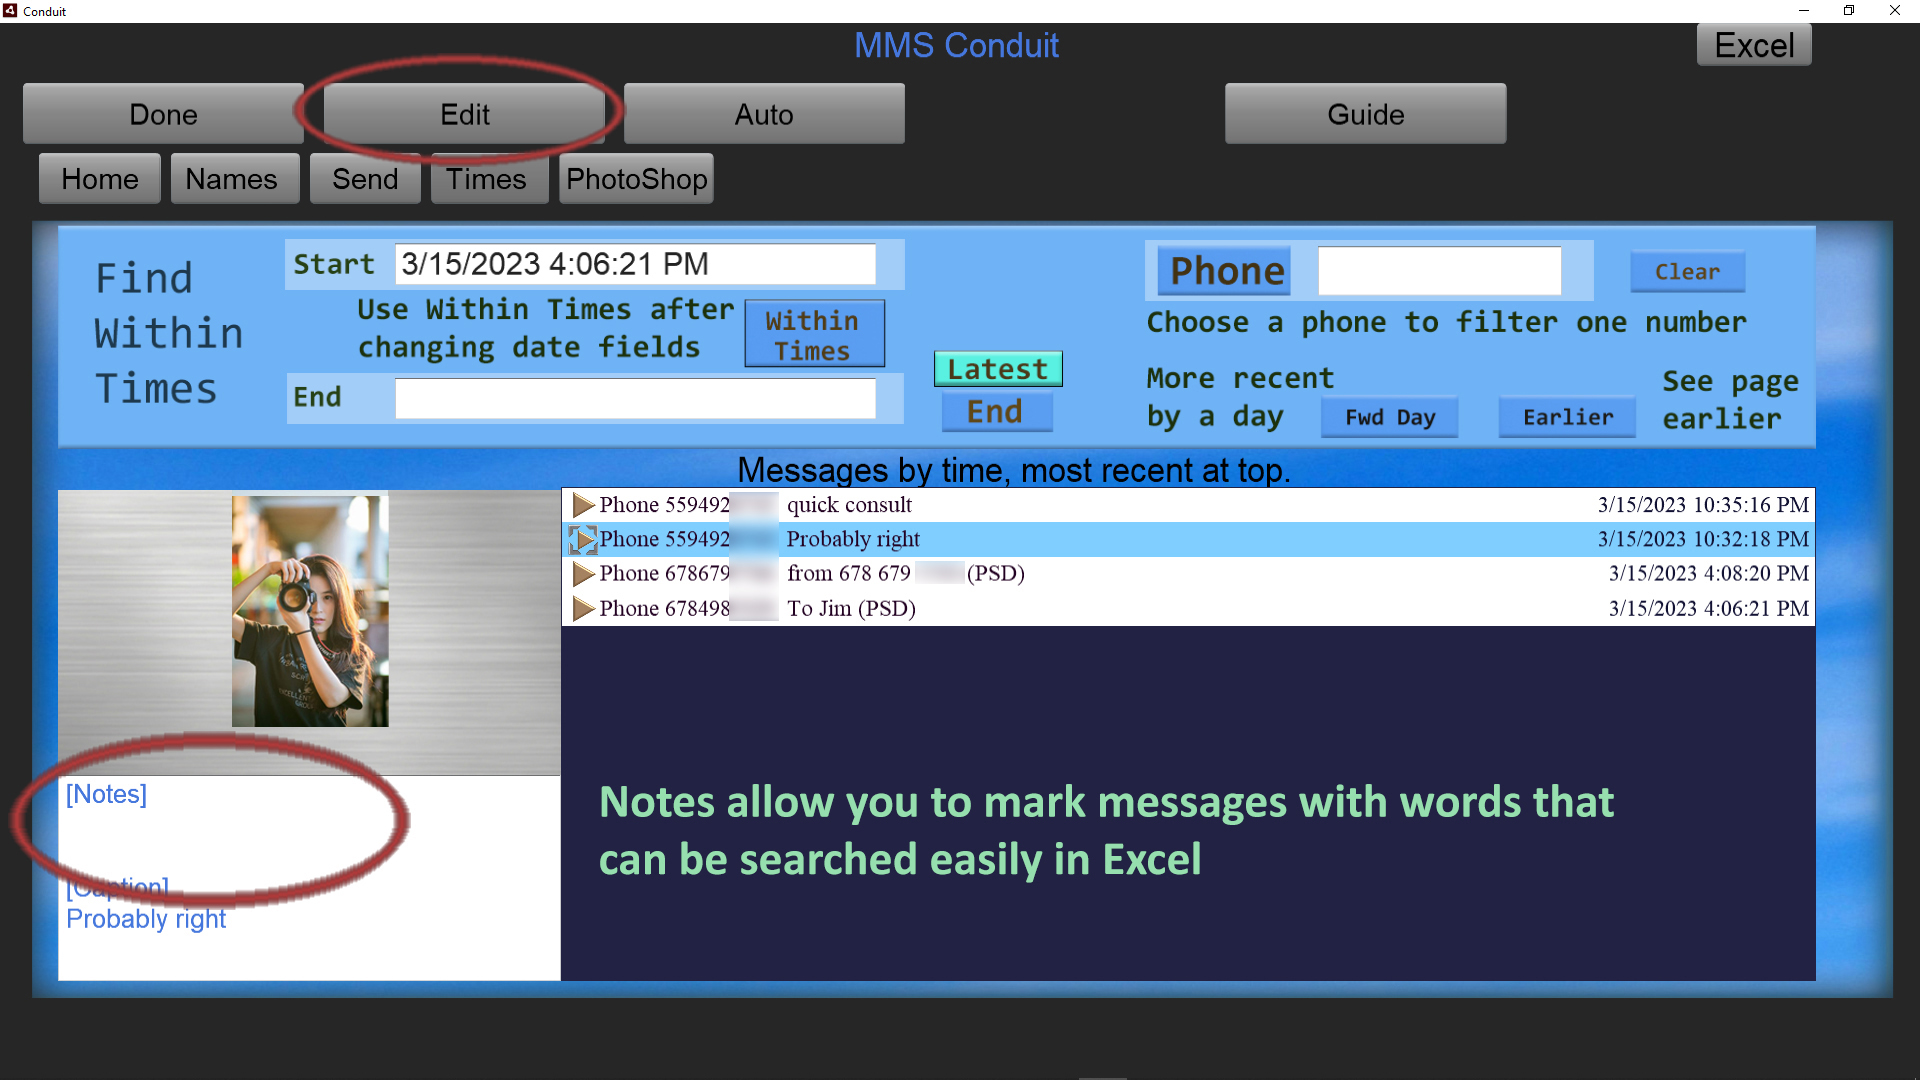
Now click on the Edit button at the top of the screen to bring the message into Photoshop.
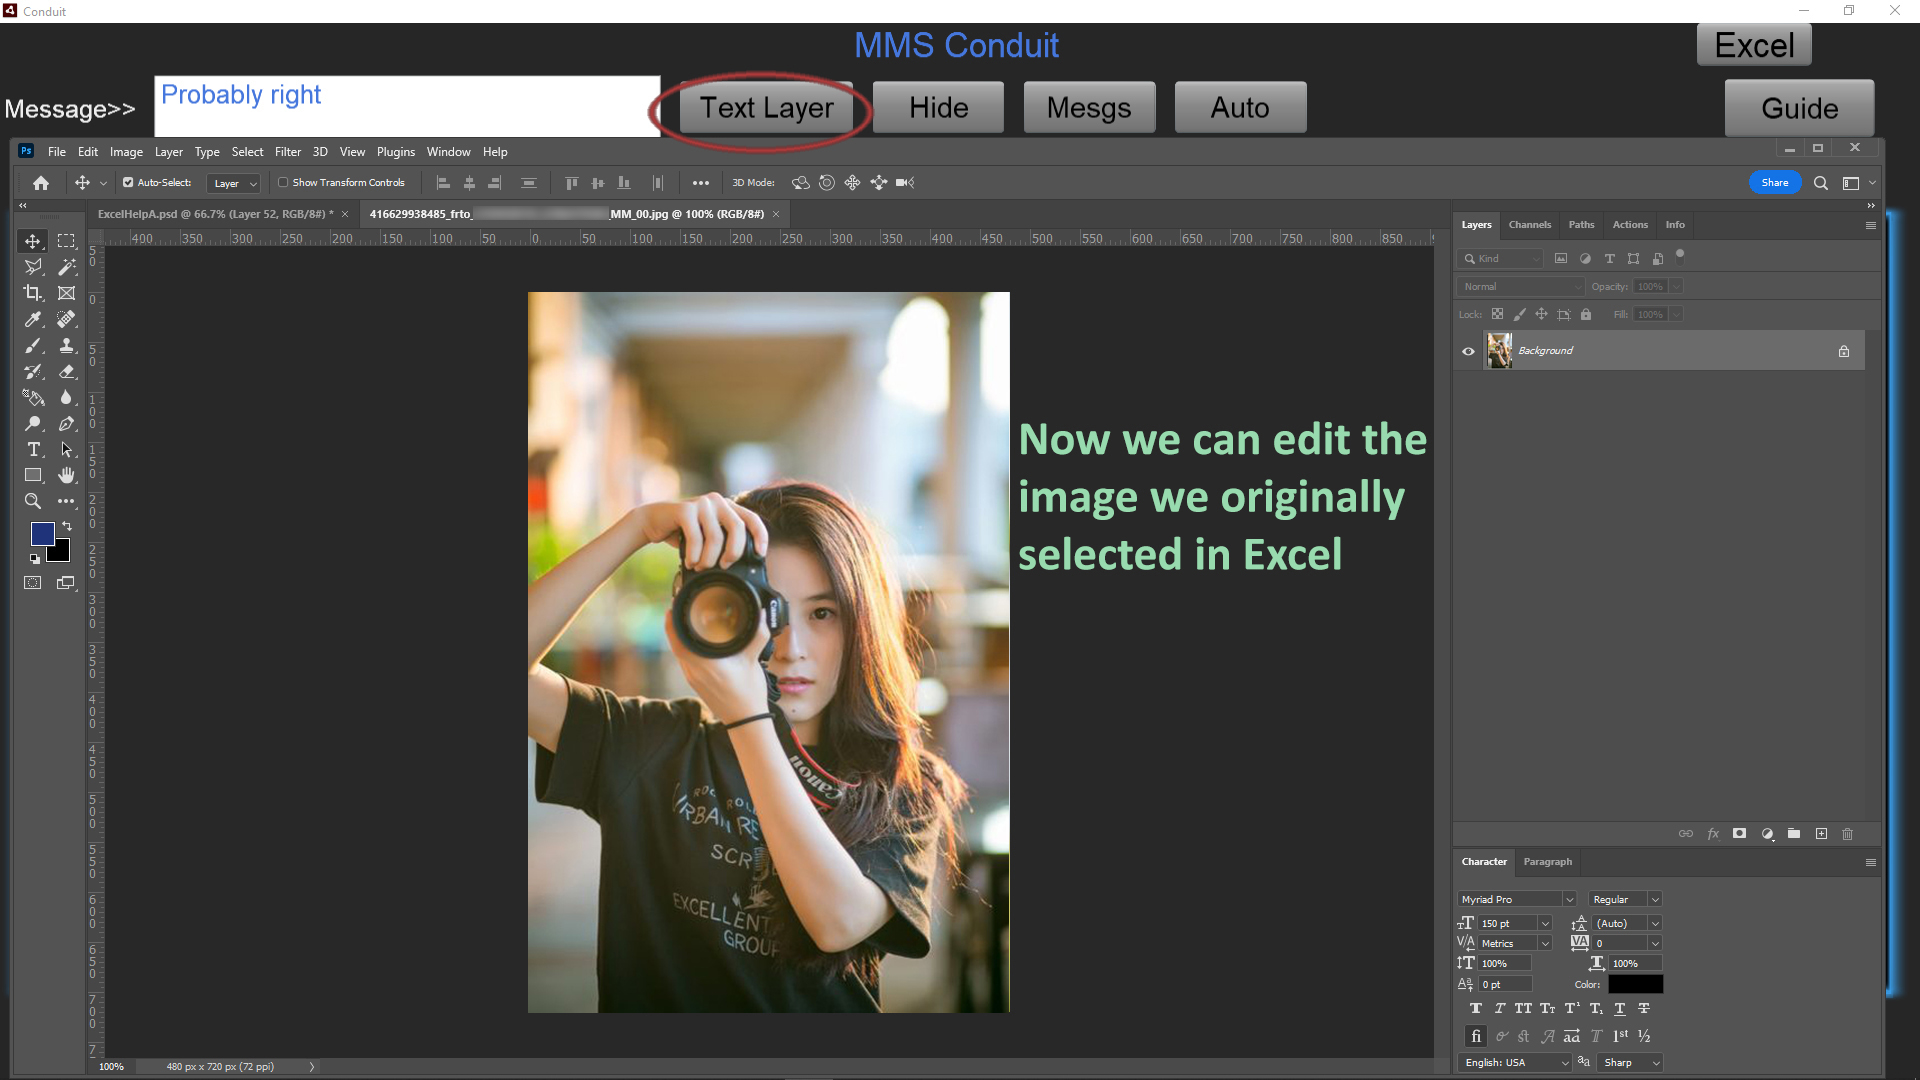
The original message image is loaded in Photoshop, and we show how to use the 'Text Layer' button, which places the received message text automatically into the image in Photoshop.
It's a common way to start, but you don't have to use the Text Layer button.
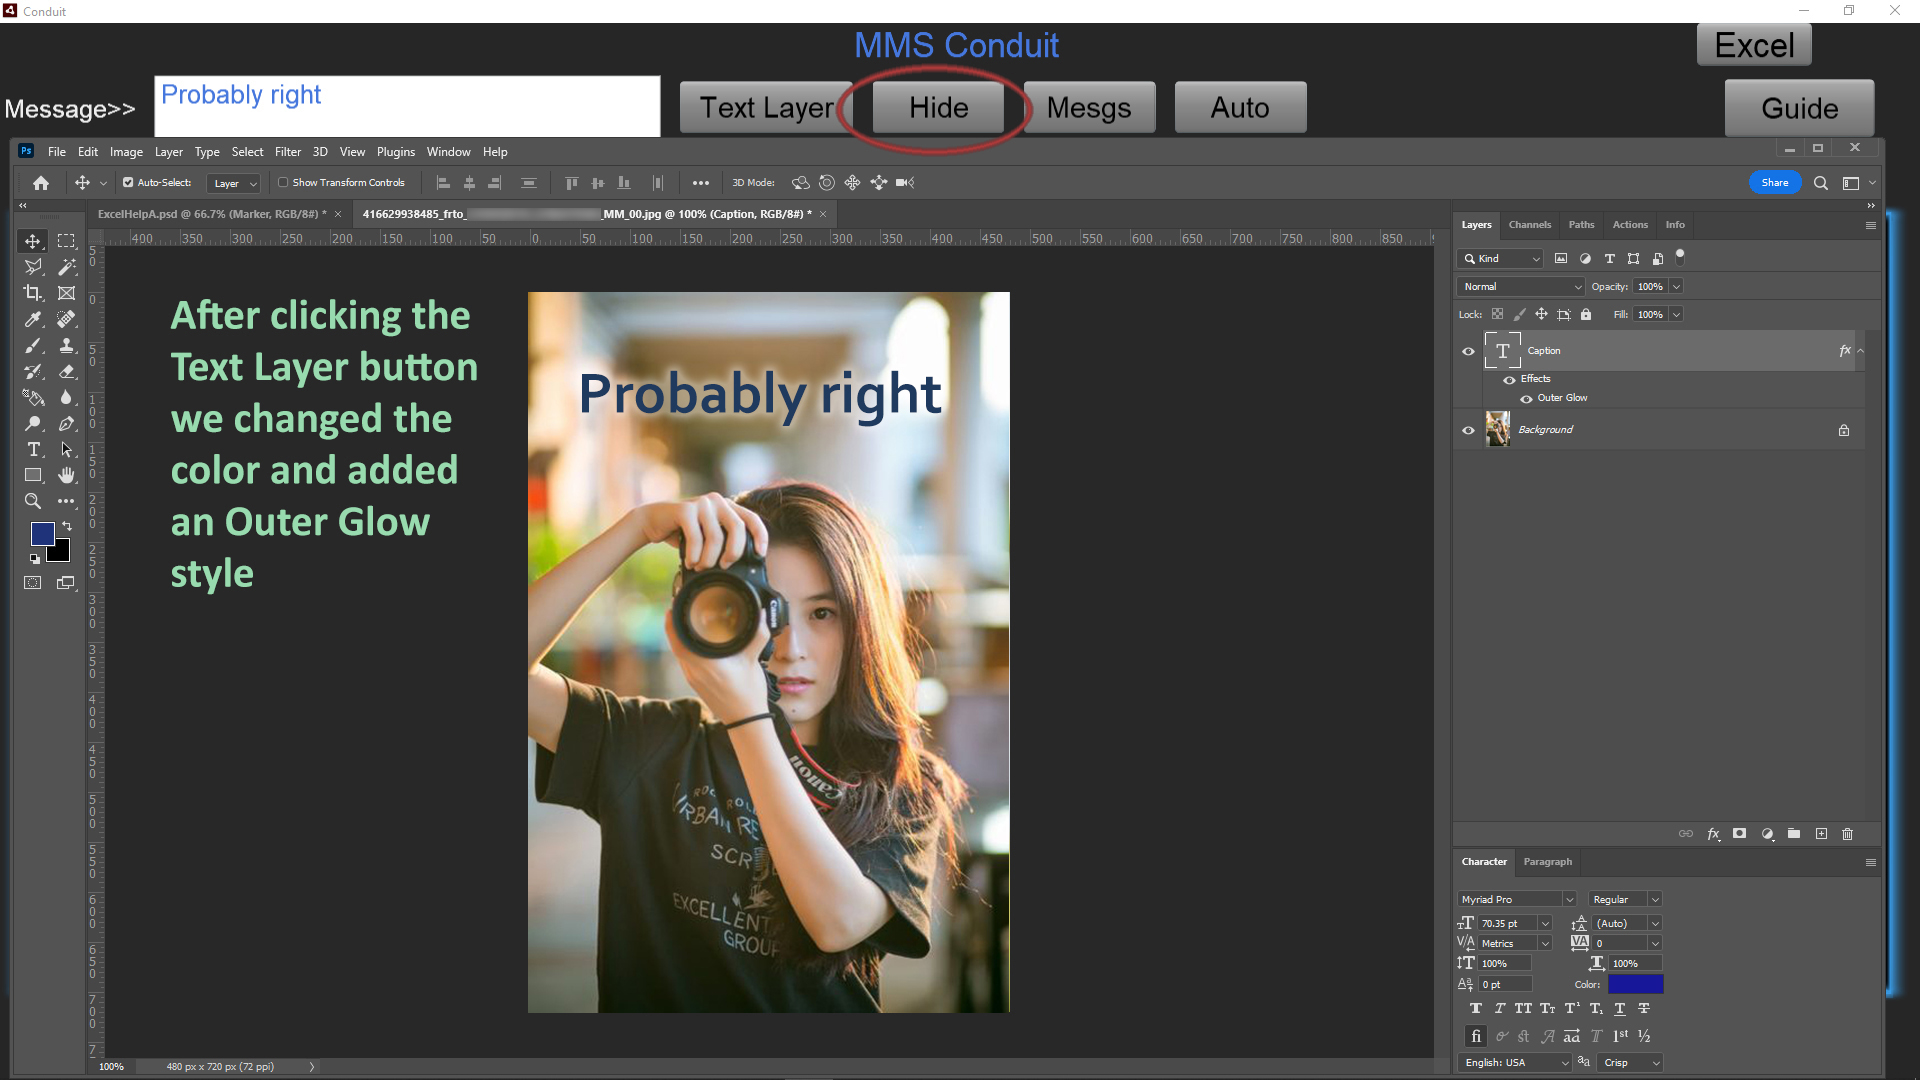
We applied further editing to the image to get the result we want to send to someone by changing the text color and adding an Outer Glow.
Now we are ready to message the result, and we use the Hide button to minimize Photoshop and get to the Send tab.
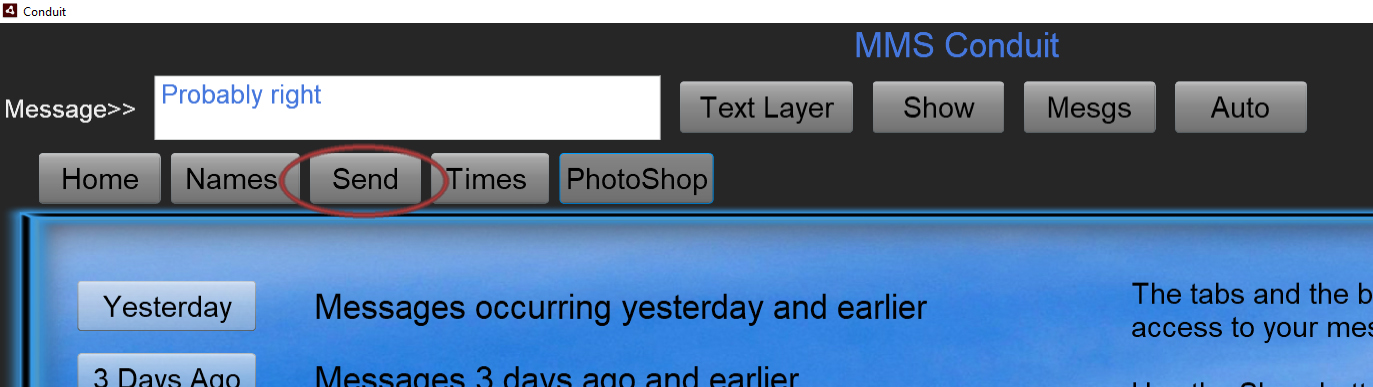
Click the Send tab.
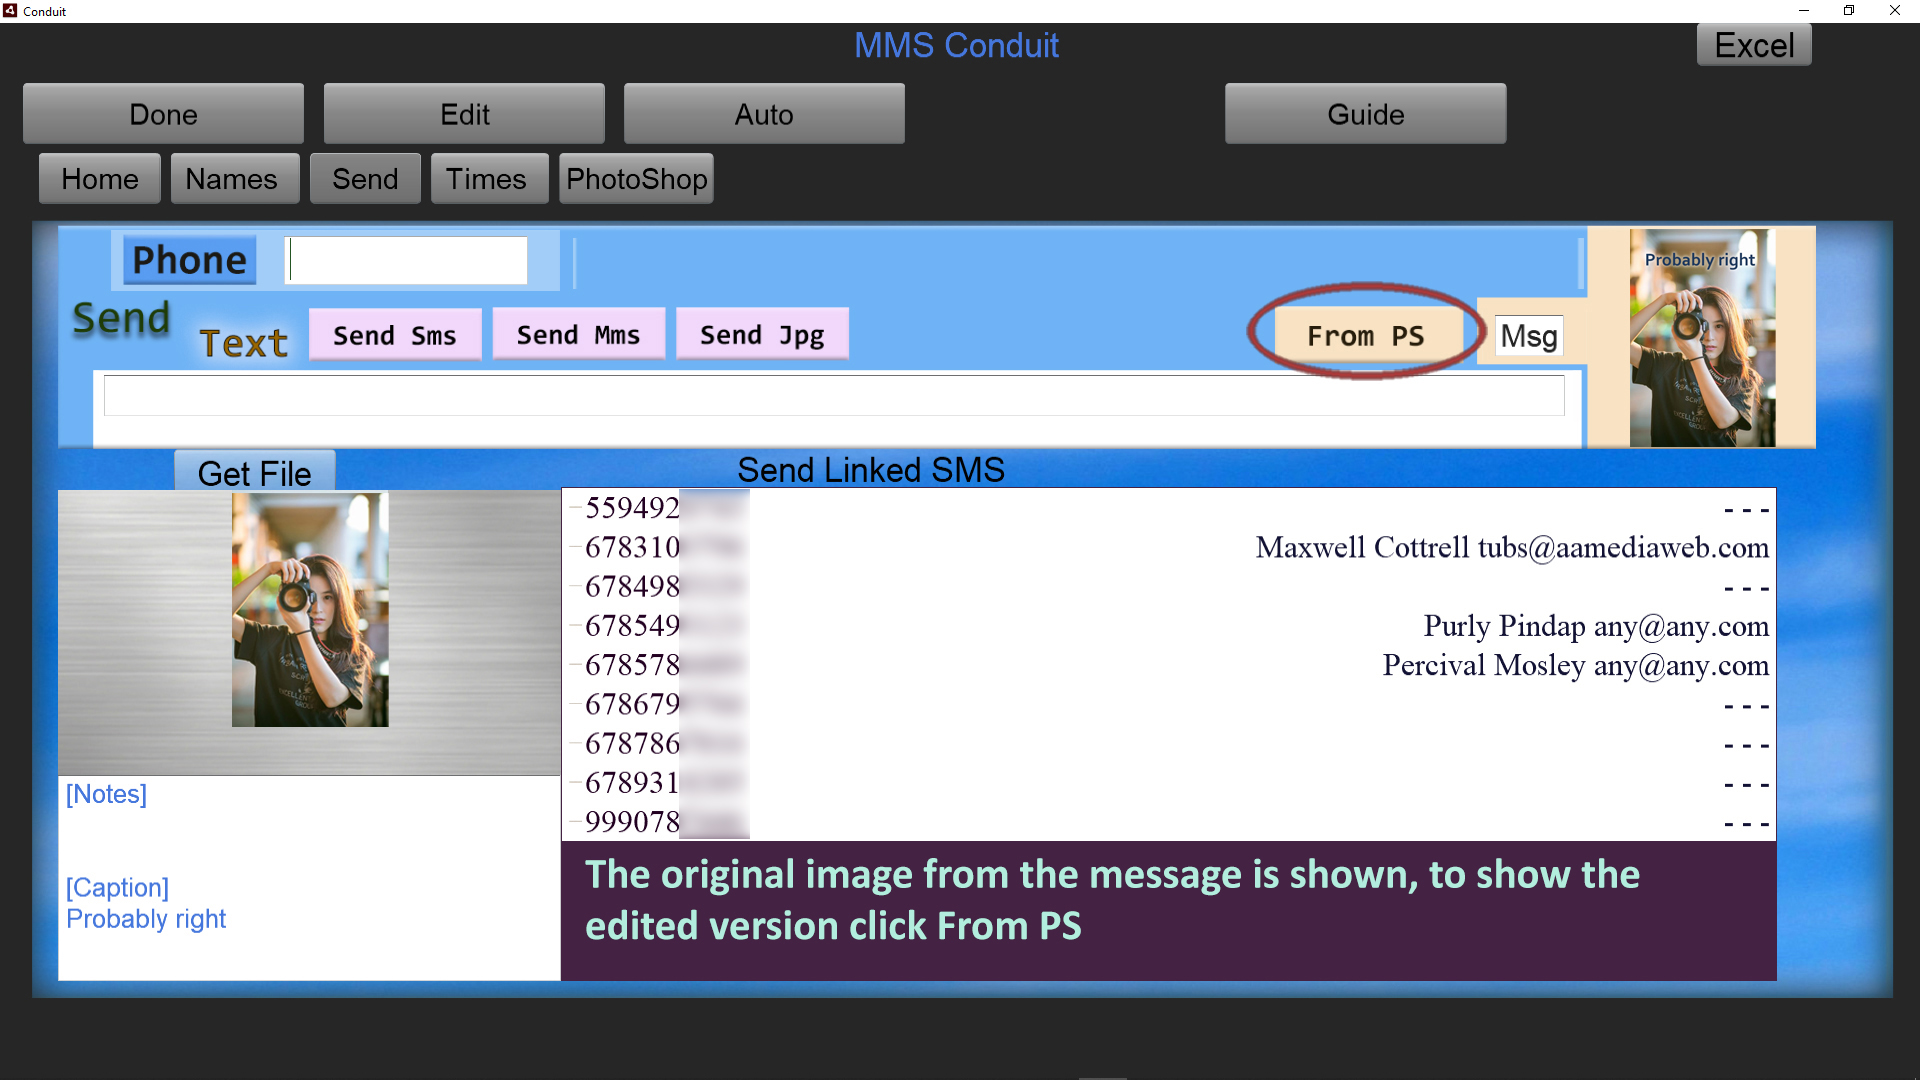
When the Send tab is entered, the original image attached to the message is shown. The label next to the thumbnail on the right shows 'Msg' indicating the original message is displayed.
To the left of the label appears the 'From PS' button which means the Jpg and Psd copied from what you had in Photoshop are now available to send.
Click on 'From PS' because we want to send what we worked on in Photoshop to someone else to work with, as a Psd.
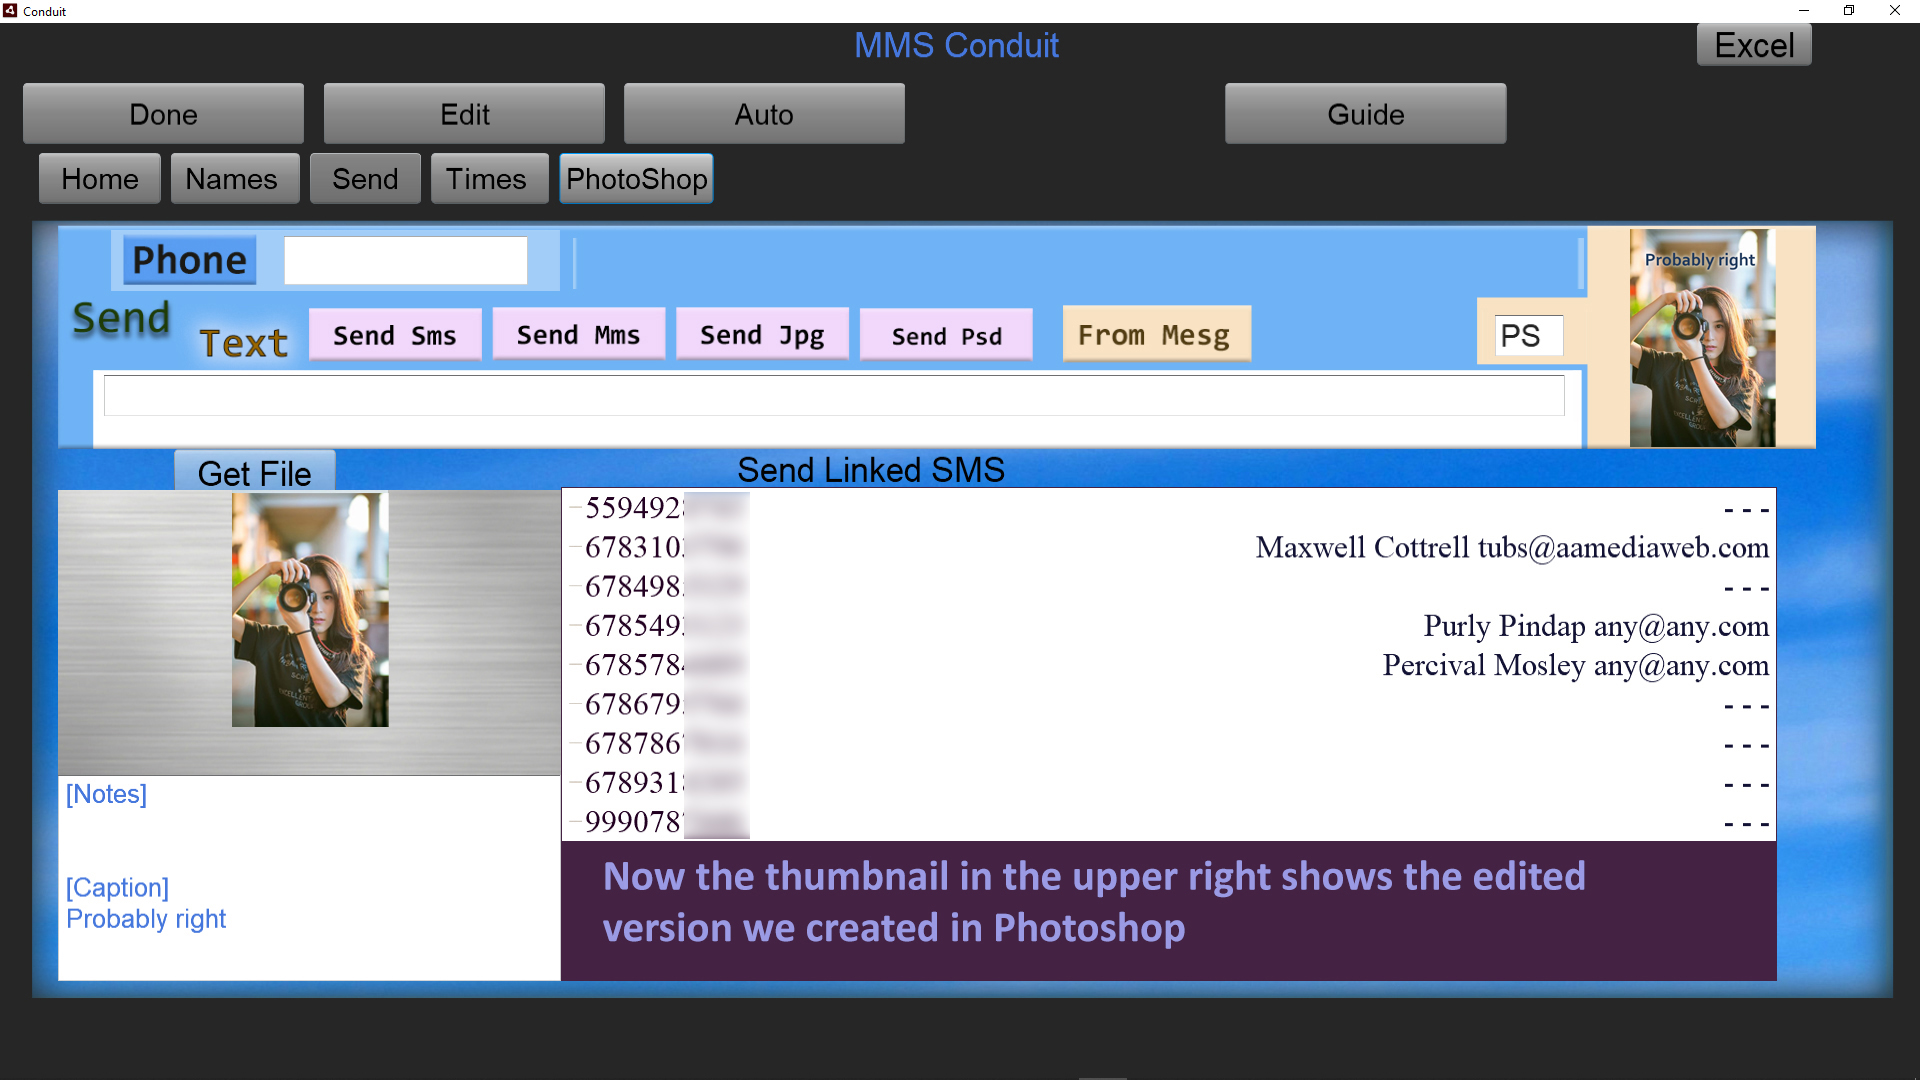
The thumbnail in the upper right now shows a copy of what we had in Photoshop. The label now displays 'PS' to indicate that we are now able to send from those copies.
Several different ways of sending the image are available. We could send it as an MMS, which is always a smaller file due to the limits of text messaging. We can instead send the Jpg at full size or the full design file, the Psd.
If we only want to send a text message we can choose 'Send Sms' and the text we provide will be the message sent.
Fill in the text of the message we want to send, and select a phone number from the list, or instead fill in the Phone field with another number if it is not in the list.
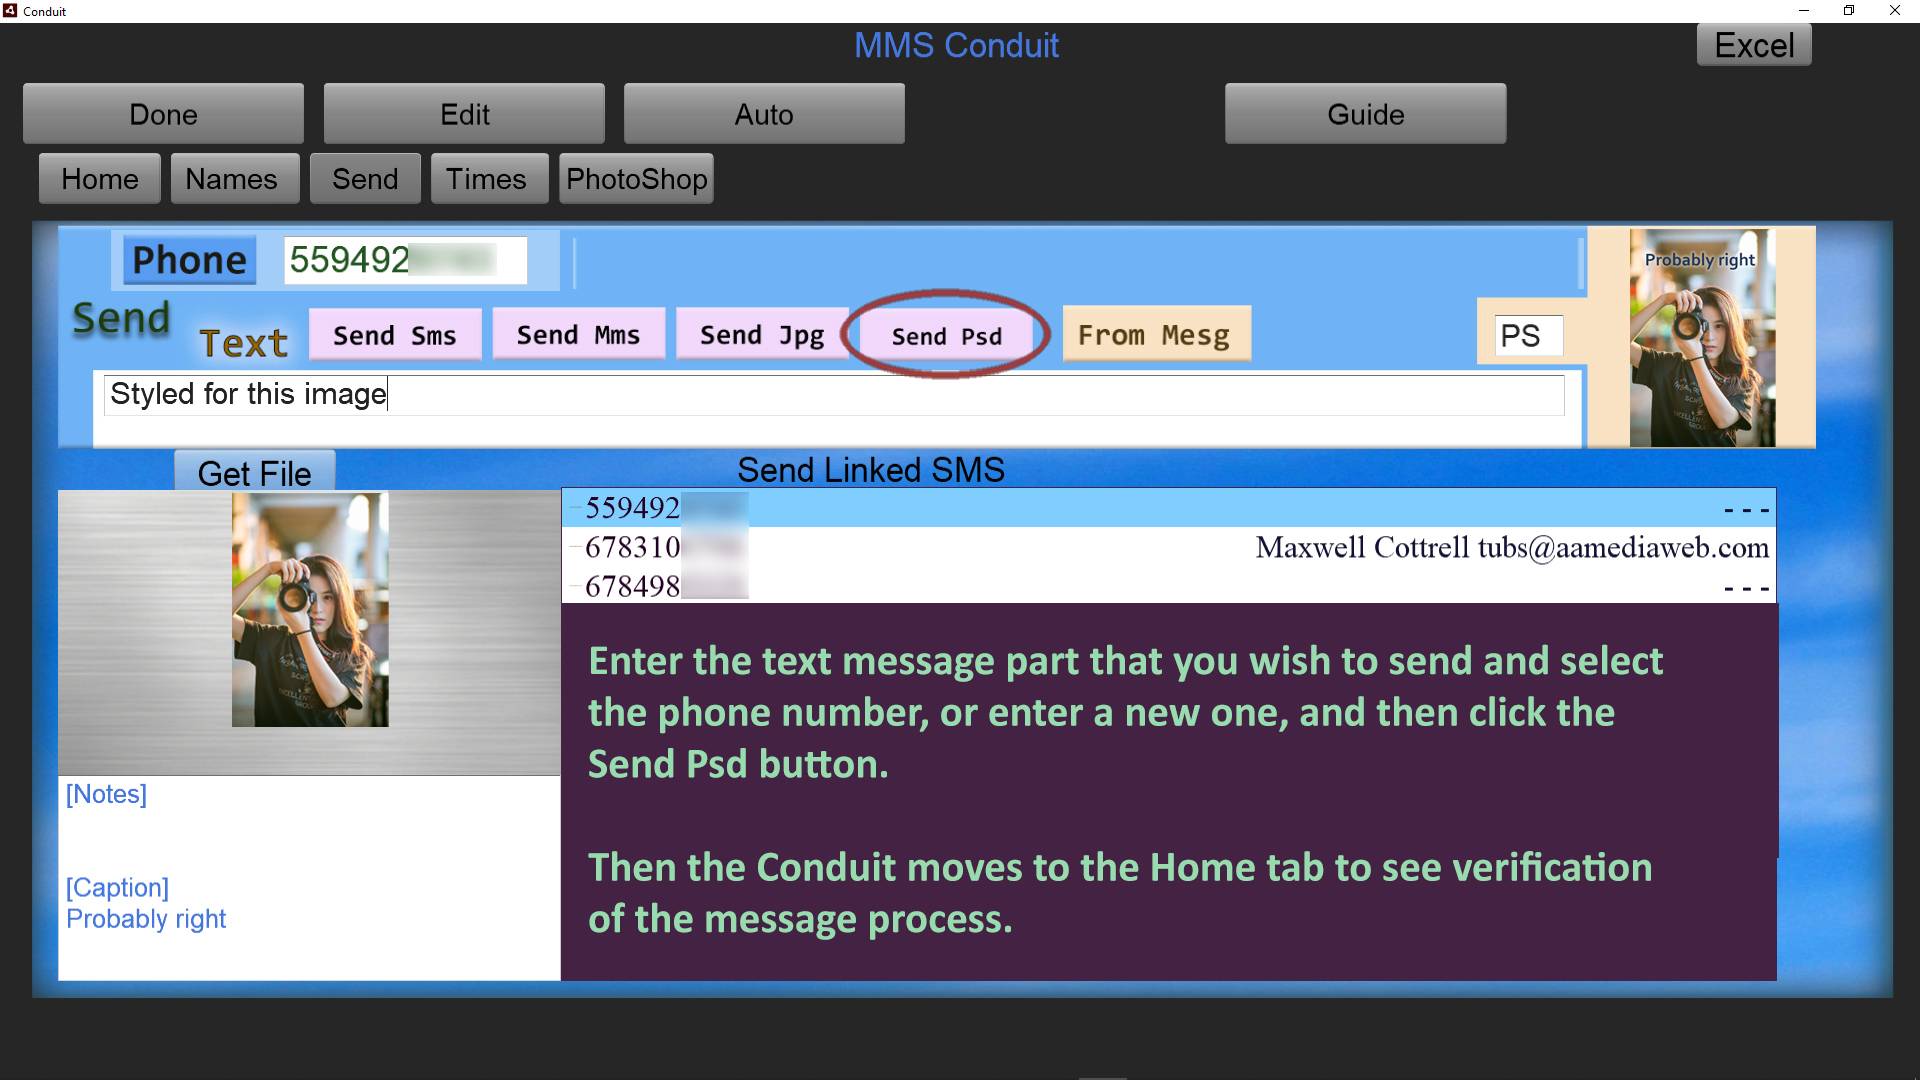
For this example we are going to send the Psd. Click 'Send Psd'. The Conduit switches to the Home tab for viewing the results.
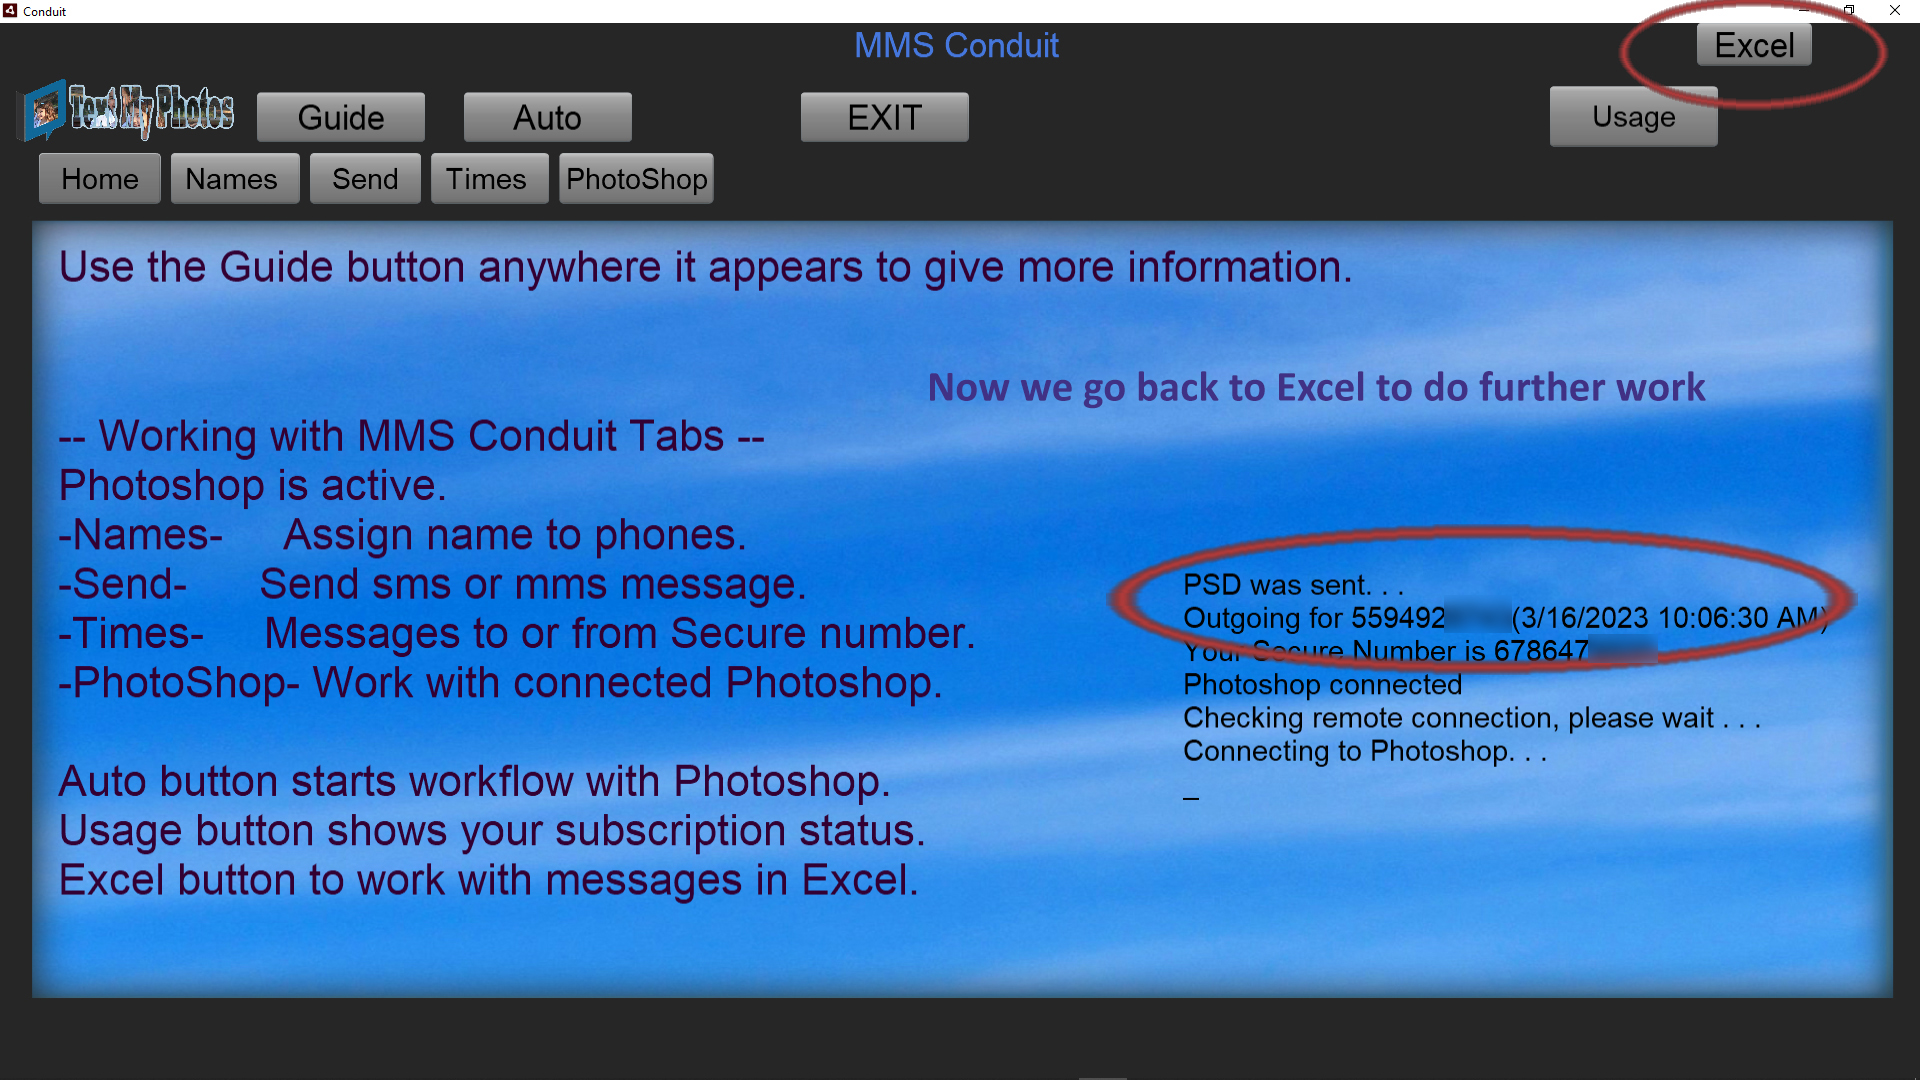
A message shows at the top of the screen, 'Outgoing . . .' followed by 'MMS was sent' or 'SMS was sent', or 'JPG was sent' or as in our example 'PSD was sent'.
Once that has occurred, we can go back to Excel by using the button on the upper right.
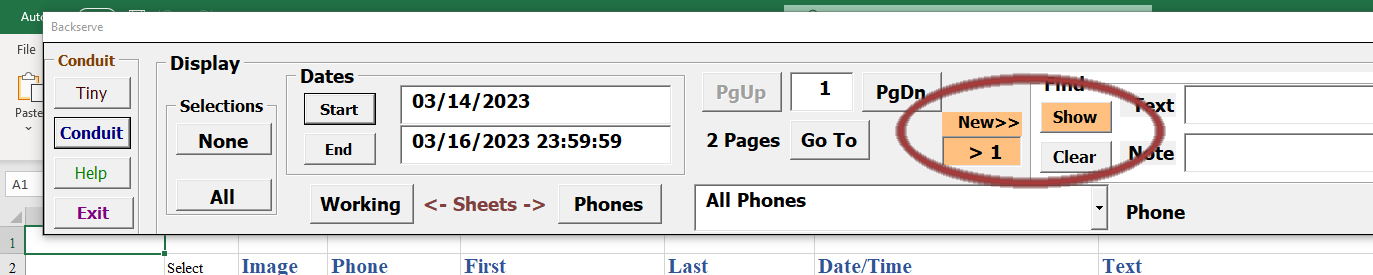
Because we sent a message, Excel counts the message and indicates we should use the Show button if we want to see updated recent message traffic. Click 'Show'.
By searching and selecting in Excel, we can collect message traffic for further editing and sending through Conduit.
()Phone Numbers
Every message that is absorbed by Excel has a phone number from the sender, or a phone number to a recipient, from the Secure Number that is part of your Conduit subscription.
The Excel workbook that is part of Conduit has a worksheet where these numbers are stored.
You may add phone numbers to the sheet along with name, email, and company informtion that helps track the phone numbers in the Conduit system.
The simple way to get to the Phones sheet is to use the Phones button.
Every message that is absorbed by Excel has a phone number from the sender, or a phone number to a recipient, from the Secure Number that is part of your Conduit subscription.
The Excel workbook that is part of Conduit has a worksheet where these numbers are stored.
You may add phone numbers to the sheet along with name, email, and company information that helps track the phone numbers in the Conduit system.
The simple way to get to the Phones sheet is to use the Phones button.
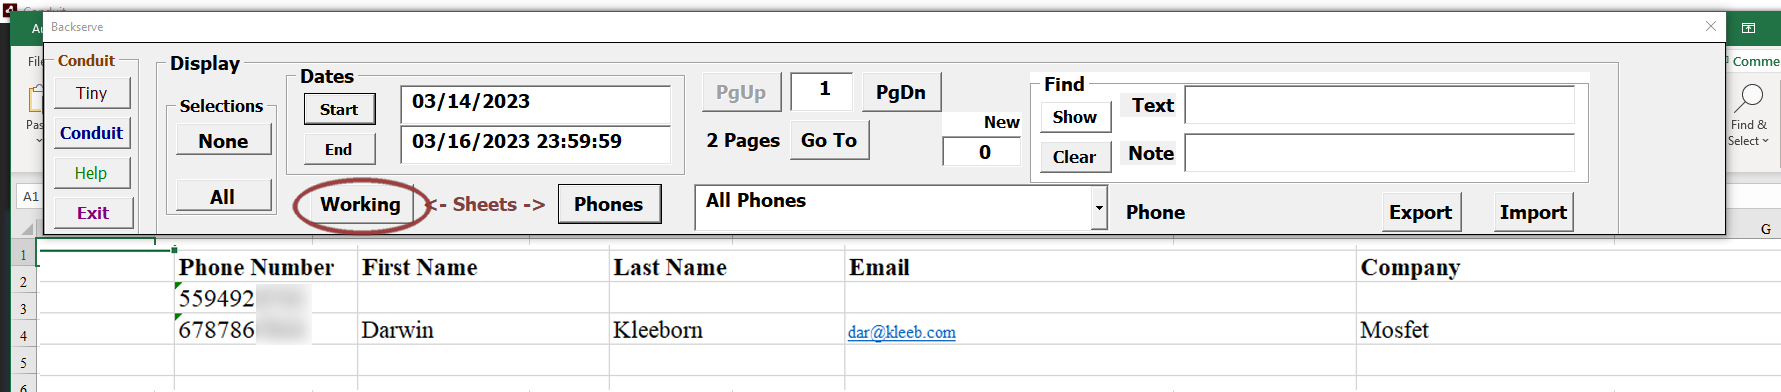
Click the Phones button to move to the Phones worksheet.
Numbers are listed in the sheet as Conduit encounters them, you can enter personal information in the phones sheet to help you better understand who you are communicating with.

In our example, we entered first, last, email and company info for one of the phone numbers.
When you are done entering the information, click on the Working button to return to the Working sheet.
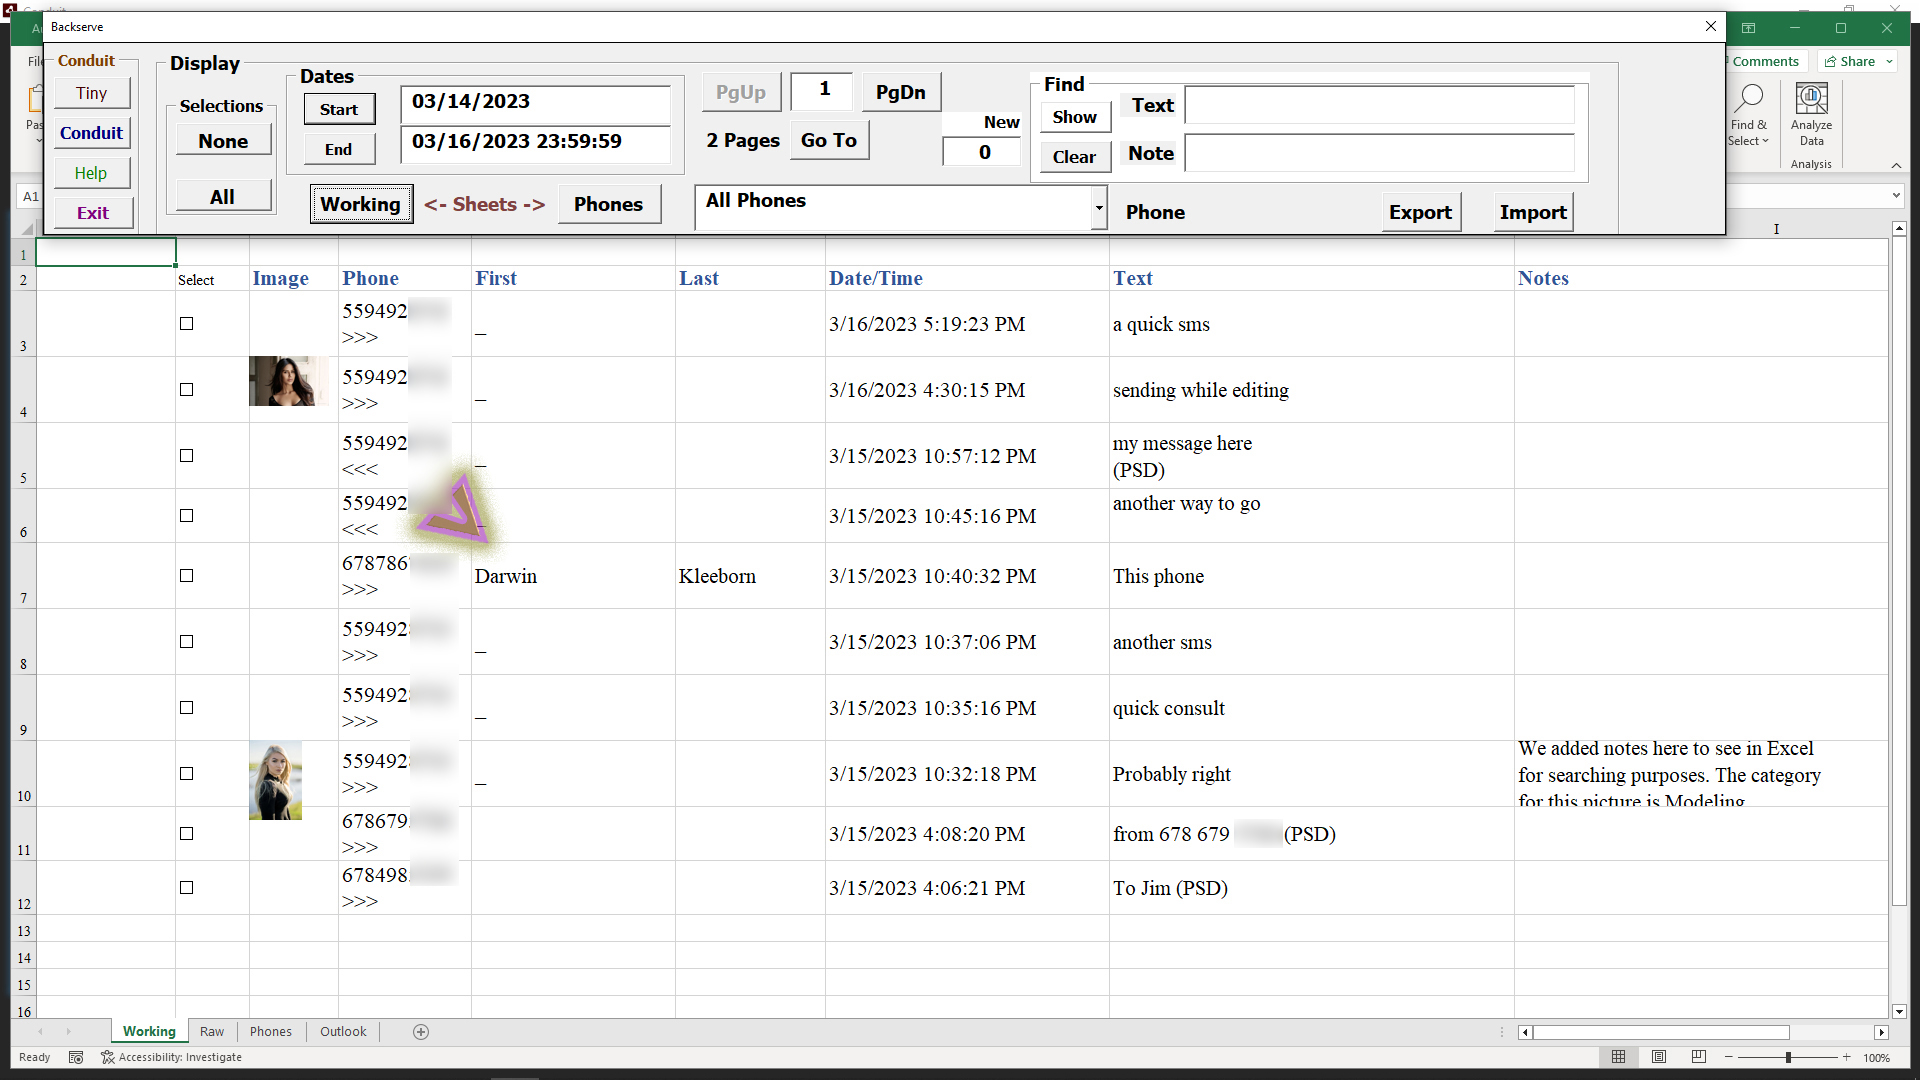
The Working sheet will now reflect what information you entered for that phone number when it lists messages you have set criteria for on the Control panel.
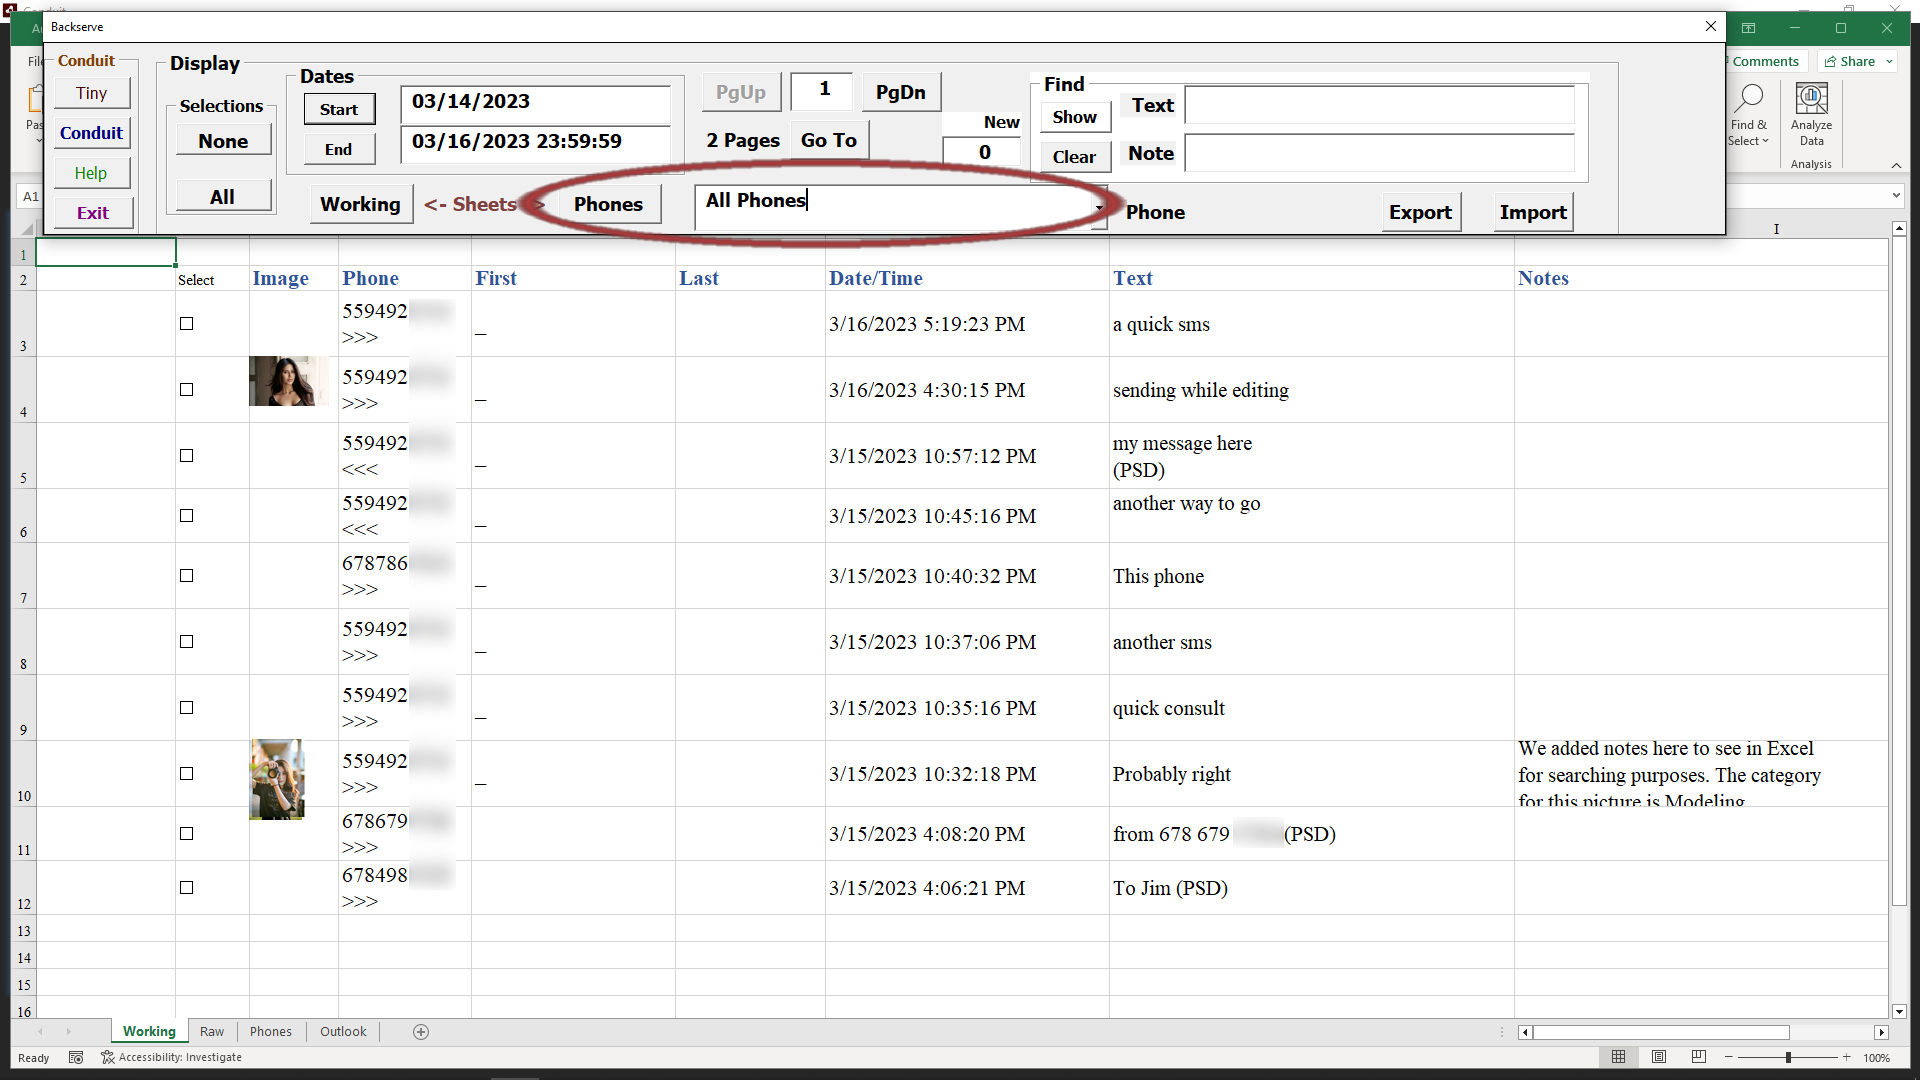
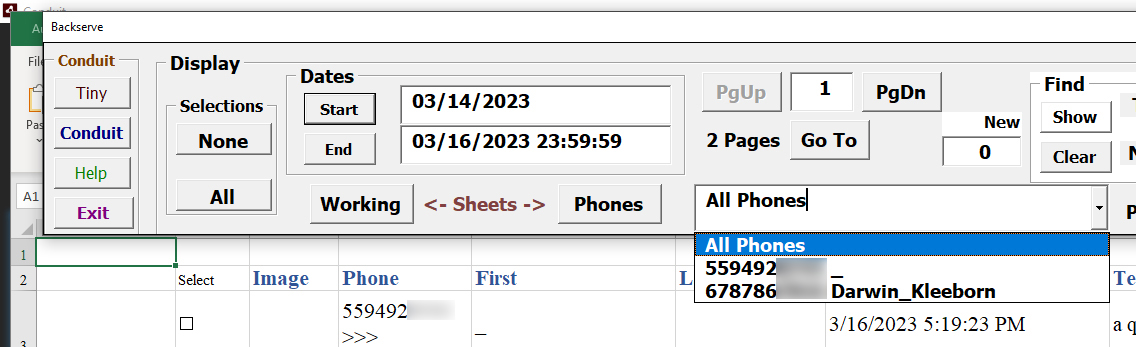
The Control panel has a drop-list labeled 'All Phones' as the normal criteria for selecting messages of interest in Excel.
You can select one of the phone numbers, then all Working sheet entries will be of that particular phone number.
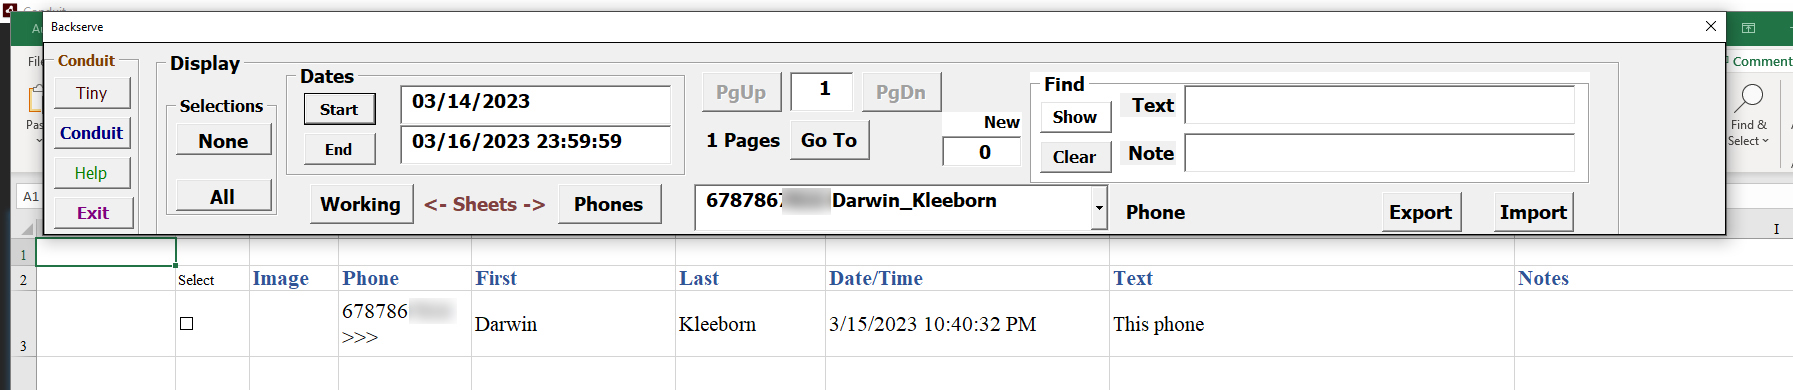
Select the phone number we added information to in the previous steps.
Now the Working sheet will only display messages for that phone number.
Remember to set the drop-list back to All Phones when you are done with that particular phone number.
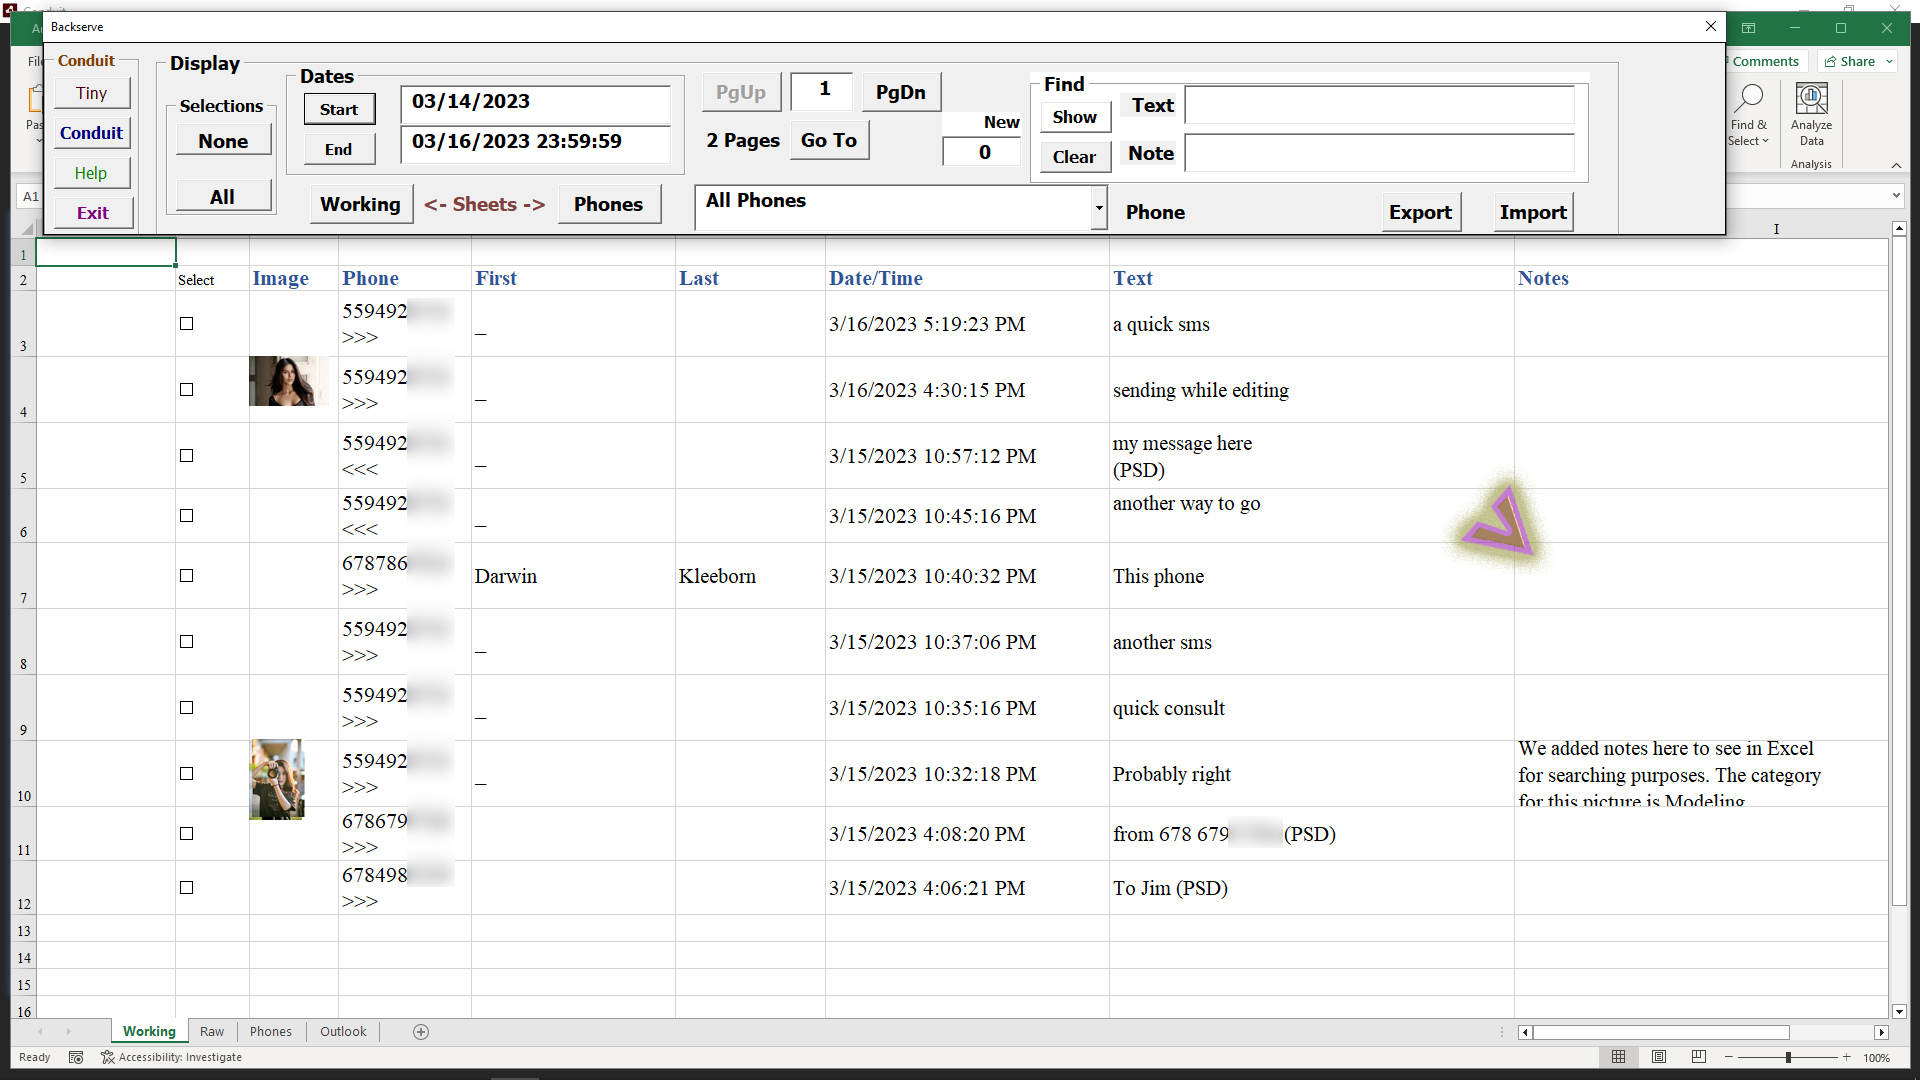
When set to All Phones, the Working sheet returns to displaying message information for all phone numbers.
Information added to phone numbers in Excel will also change the information for the Conduit. When information is changed in Conduit it will also be displayed in Excel.
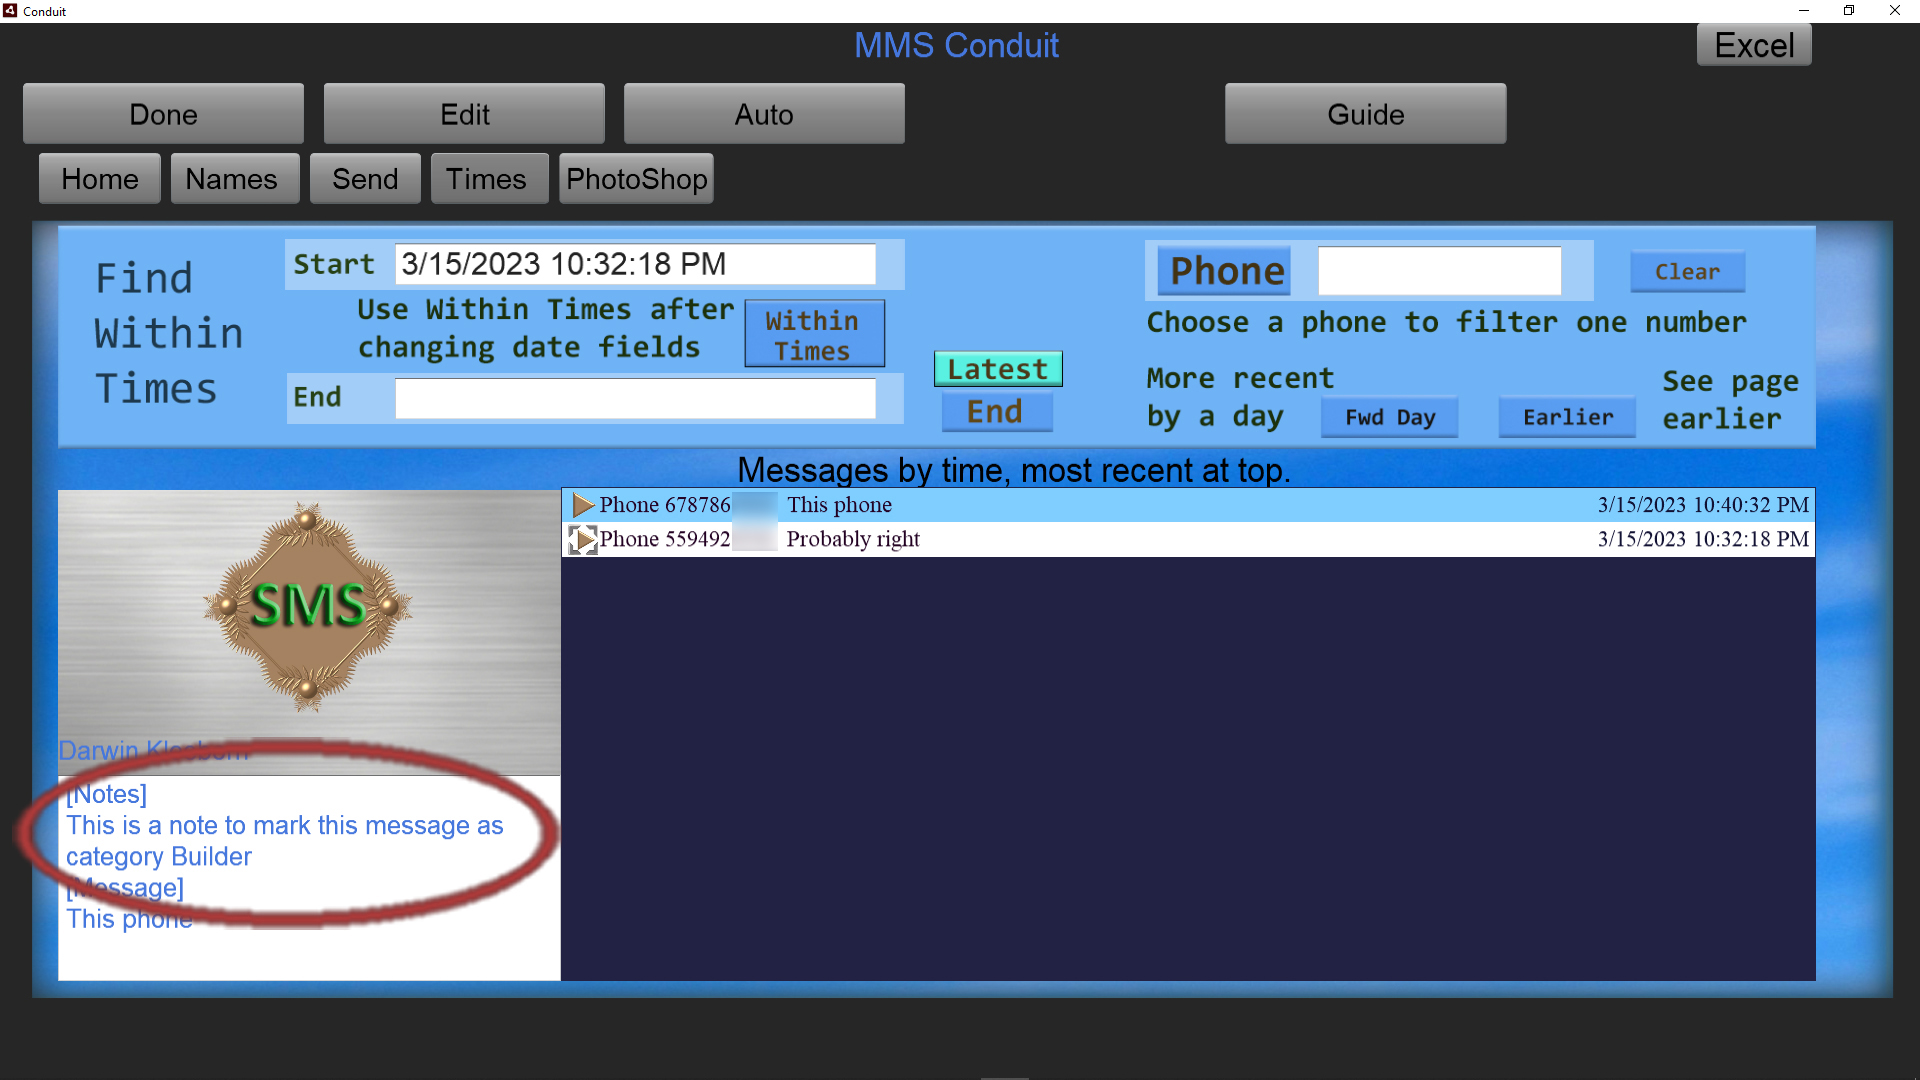
()Notes Column on Working Sheet
The Excel workbook can be used to insert notes about messages, to make it easier to find important information later on.
When a message is part of the Working sheet, you can change the Notes column and information placed in that column will persist both in Excel and in the Conduit.
Once you edit the column for a particular message, that information stays with the message.

Select the checkboxes for the messages that you want to work with in Conduit for editing or sending.

Click the Conduit button in the Control panel.
The two messages we selected will show in the Conduit Times tab, We clicked the entry in the message list that was changed in Excel.
In Conduit you can modify the notes, and these changes will show up in Excel also.
Return to Excel by clicking the Excel button in the upper right of Conduit.

When we enter a phrase or word mentioned in the notes of a message we can search for it and isolate those messages quickly.
We used the word Builder in the message notes for the one we changed in Excel.
Enter that into the Note search field, and click the Show button.

Now you can see the messages with Builder in the Notes field, our notes were the only message with that term.
Make sure you hit the Clear button to remove that search restriction after working with the message that you searched for.
()Exiting the Program
()Go Back
()M
